JTAG & Flipper Zero: To repair the Proxmark3

If you got your device bricked, unresponsive, or stuck in a bad firmware state, don’t worry — there’s a way to bring it back to life using JTAG.
JTAG is one of the most widely used interface for debugging when it comes to testing (not only security) of the embedded devices. In this guide, I will walk you through the entire process of repairing a Proxmark using the Flipper Zero as a JTAG tool. Whether you’re dealing with a bad flash or an unresponsive bootloader, this method will help you recover your device step by step. What is even more important, you will learn how to use JTAG on a real world example!
Context for this story
At our office, during the late evening, we had an idea to update the firmware of our Proxmark3, which we use for various penetration tests tasks, especially Red Teaming. We started the update procedure and a lot of red warnings showed up while the firmware was being flashed. I told that to my friend, who immediately pressed Ctrl + C on the keyboard. As many of you might have guessed, you should never ever do that…
Upgrading the bootrom of your Proxmark can brick the device. Please exercise caution when upgrading the bootloader.
some info in Proxmark docs which we didn’t read
However, there wouldn’t be a better moment to introduce you the process of repairing broken devices via diagnostic ports such as JTAG!
What is JTAG?
JTAG (Joint Test Action Group) is an industry-standard interface used for debugging, programming, and testing embedded systems and microcontrollers. Originally designed for boundary scan testing in integrated circuits, it has become a crucial tool for low-level hardware debugging, firmware flashing, and even security research.
JTAG operates through a standardized serial protocol that allows direct communication with a device’s CPU or memory, bypassing traditional software-based methods. This makes it especially useful for unbricking devices, modifying firmware, and reverse engineering. Most embedded systems feature a JTAG interface, typically exposed as a set of test points or a dedicated header.
In the context of repairing a Proxmark, JTAG enables direct access to its microcontroller, allowing you to reflash firmware, debug boot issues, and recover from a bricked state. With tools like the Flipper Zero, which supports JTAG, you can connect to the Proxmark and restore it to a working state without requiring specialized hardware programmers.
Why Flipper Zero? 🐬
The Flipper Zero is a versatile, portable hacking tool that includes built-in support for JTAG, making it a convenient choice for repairing bricked devices (like our Proxmark!). While there are many dedicated JTAG adapters available — such as the SEGGER J-Link, FTDI-based interfaces, or OpenOCD-compatible programmers — the Flipper Zero stands out due to its accessibility, popularity, and ease of use. It eliminates the need for additional hardware, as many enthusiasts already own one for various security and debugging tasks.
Repairing Proxmark3
Our plan is to flash fresh firmware onto Proxmark3 via JTAG. FlipperZero with DAPLink will be our JTAG tool and we will use OpenOCD software as an interface for it.
What do you need?
Hardware
- any PC running Linux (we use Kali)
- Flipper Zero (acting as the JTAG adapter & running the newest firmware, to ensure JTAG functionality is available)
- Proxmark3 (the bricked device)
- 6 jumper wires (DuPont jumper wires)
- USB-C cable (to connect Flipper Zero to your PC)
Software
- OpenOCD – Open-source software for interfacing with JTAG – download here & compile it following the steps in the next section (because the one in your distro’s repositories is probably outdated)
- DAPLink Flipper app – can be installed from lab.flipper.net after you connect your Flipper via USB
- Proxmark Iceman firmware – a prebuilt Iceman fork (a version for penetration tests and more advanced tasks) image can be downloaded here in the Latest official build section
- Proxmark Iceman repository – repository which contains the configurations for AT91SAM7S microcontroller. Use below command to clone it:
git clone --depth=1 https://github.com/RfidResearchGroup/proxmark3
Compiling & installing OpenOCD
OpenOCD is usually available in apt repositories, but it is often outdated. Therefore, we are going to download and compile OpenOCD ourselves.
Firstly, install the dependencies and staff for building:
sudo apt update && sudo apt install -y build-essential libtool autoconf automake texinfo libusb-1.0-0-dev libftdi1-dev libhidapi-dev pkg-configCode language: CSS (css)Then, download OpenOCD from SourceForge. Extract the downloaded archive, open the terminal in the extracted directory and use following commands to compile and install OpenOCD:
./configure CFLAGS="-O0 -Wno-error"
make
sudo make installCode language: JavaScript (javascript)
We are using CFLAGS="-Wno-error" as some warnings were treated as errors and didn’t let the compiler to finish its job.
Now you should be able to start openocd --version and get similar output:
$ openocd --version
Open On-Chip Debugger 0.12.0
Licensed under GNU GPL v2
For bug reports, read
	http://openocd.org/doc/doxygen/bugs.htmlCode language: JavaScript (javascript)
Setting up UDEV rules for Proxmark3 & OpenOCD
sudo wget https://github.com/RfidResearchGroup/proxmark3/blob/master/driver/77-pm3-usb-device-blacklist-dialout.rules -O /etc/udev/rules.d/77-pm3-usb-device-blacklist-dialout.rules
sudo wget https://github.com/RfidResearchGroup/proxmark3/blob/master/driver/77-pm3-usb-device-blacklist-uucp.rules -O /etc/udev/rules.d/77-pm3-usb-device-blacklist-uucp.rules
sudo wget https://raw.githubusercontent.com/arduino/OpenOCD/refs/heads/master/contrib/60-openocd.rules -O /etc/udev/rules.d/60-openocd.rules
sudo udevadm control --reload-rules
sudo udevadm triggerCode language: JavaScript (javascript)
Connecting the PC, FlipperZero and Proxmark3
Start FlipperZero and go to Apps → GPIO → DAP Link.
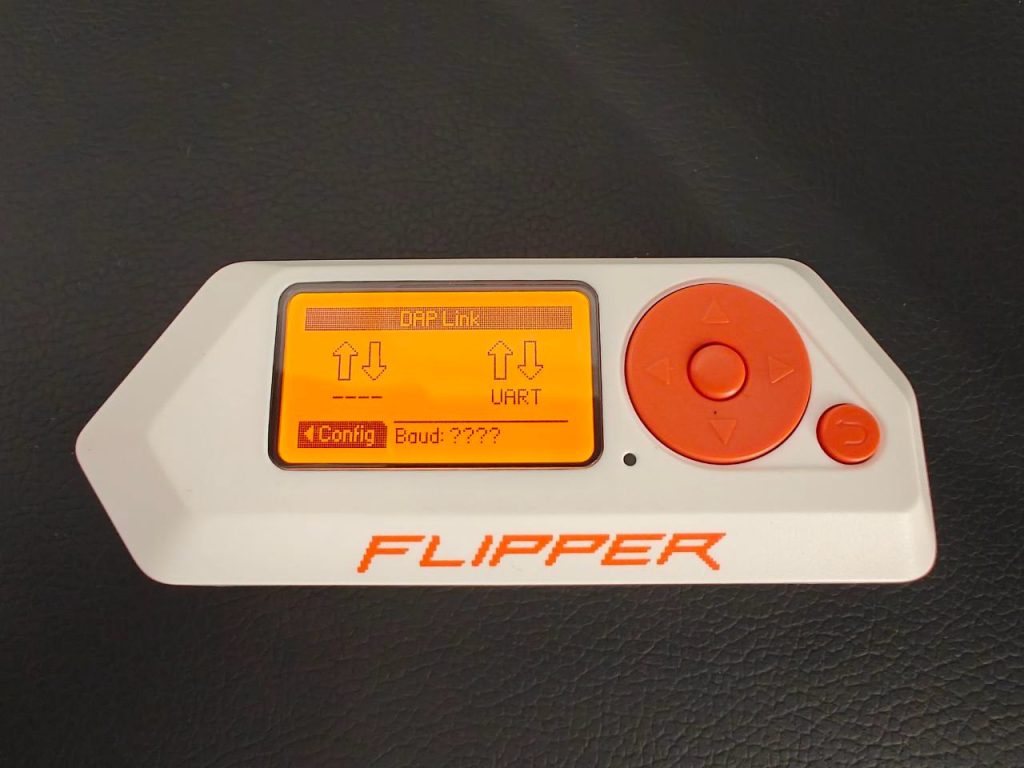
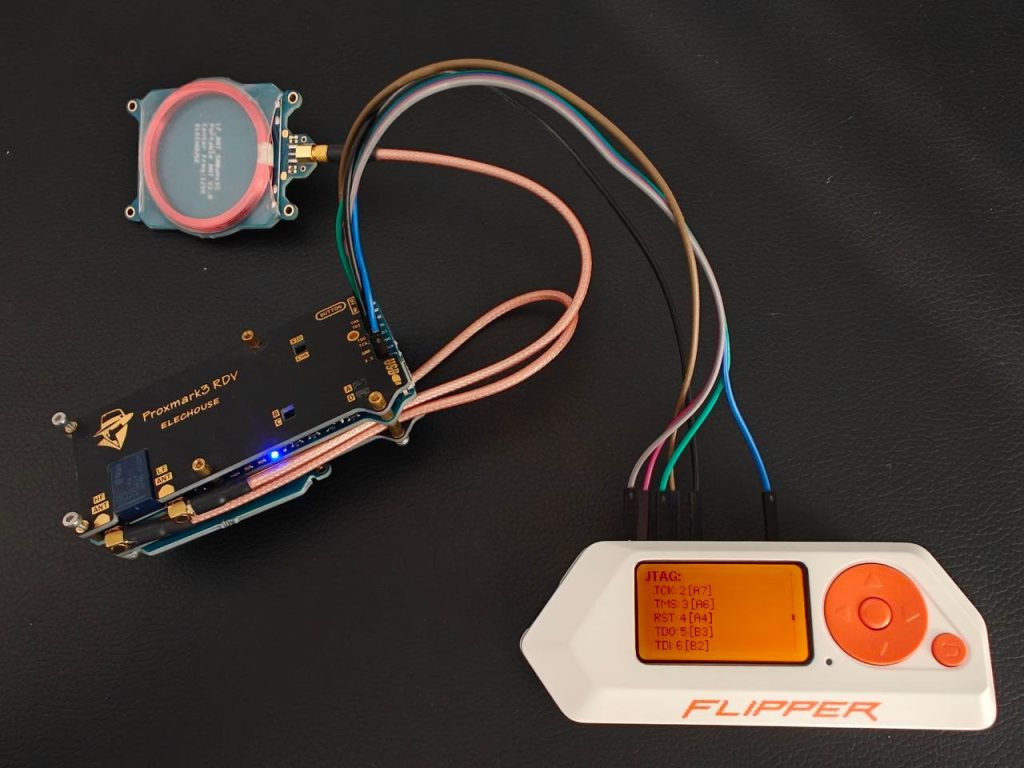
When you go to Config → Help and Pinout and move down, you will see the pinout for JTAG. Connect the jump wires to the Proxmark, and then to the Flipper accordingly, apart from the RST. Remember to connect the GND cable firstly, and 3.3V lastly (these two are even not mentioned in the pinout). In total, 6 jump wires should be connected.
Now, connect the Flipper to your PC. If everything is connected correctly, you should see /dev/ttyACMx connected. If you don’t see it, the connection might be incorrect.
$ ls /dev | grep ACM
ttyACM0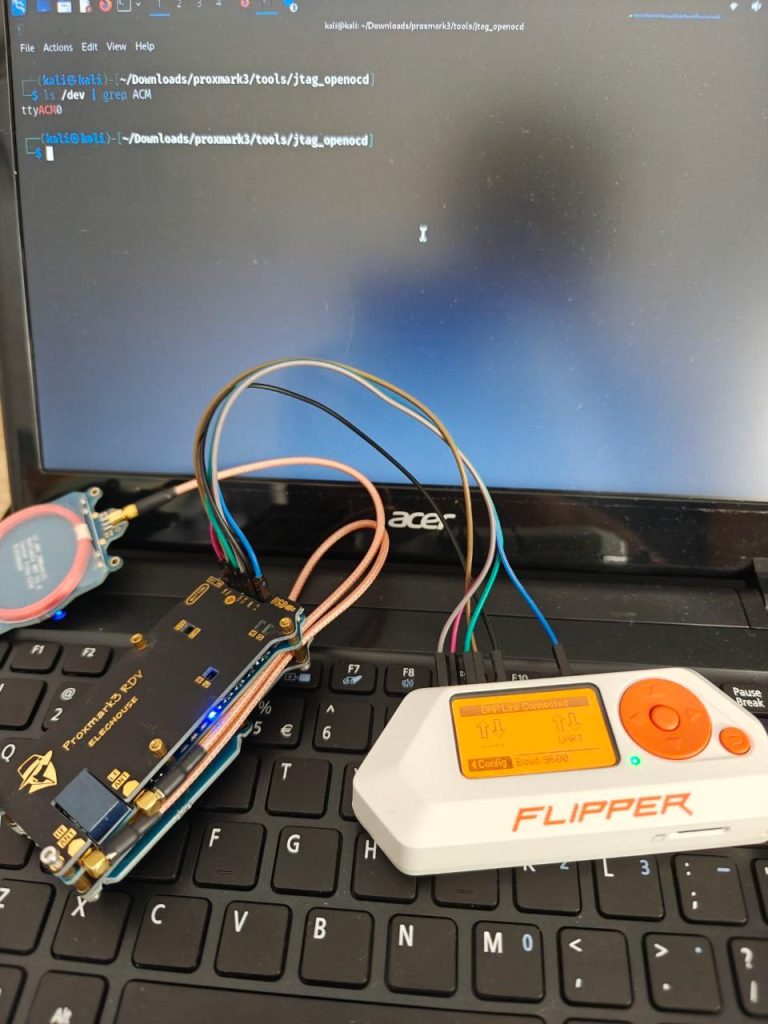
Flashing Proxmark3 with OpenOCD & JTAG
Below is an OpenOCD command that will start the JTAG connection (via Flipper Zero) with Proxmark3:
openocd -f /usr/local/share/openocd/scripts/interface/cmsis-dap.cfg -c "transport select jtag" -f /home/kali/Downloads/proxmark3/tools/jtag_openocd/board-at91sam7s.cfgCode language: JavaScript (javascript)-f /usr/local/share/openocd/scripts/interface/cmsis-dap.cfg
The-foption tells OpenOCD to load a configuration file. This specific file (cmsis-dap.cfg) sets up OpenOCD to use a CMSIS-DAP compatible adapter as the JTAG/SWD interface. In our case, it is a Flipper Zero, which supports CMSIS-DAP in JTAG mode.-c "transport select jtag"
The-coption allows executing a command within OpenOCD.transport select jtagexplicitly tells OpenOCD to use JTAG instead of SWD or another transport method. This is necessary because CMSIS-DAP adapters also support SWD (Serial Wire Debug), which is often used for ARM devices. This command forces JTAG mode.-f /home/kali/Downloads/proxmark3/tools/jtag_openocd/board-at91sam7s.cfg
This is another configuration file, specifically for the AT91SAM7S microcontroller, which is used in the Proxmark3. This script contains details on how to communicate with the AT91SAM7S via JTAG, including memory layout, flash settings, and initialization procedures. The files come from Proxmark3 repository Iceman fork. Remember to change the path to the correct one.
Below is the output of the mentioned command:
$ openocd -f /usr/local/share/openocd/scripts/interface/cmsis-dap.cfg -c "transport select jtag" -f /home/kali/Downloads/proxmark3/tools/jtag_openocd/board-at91sam7s.cfg
Open On-Chip Debugger 0.12.0
Licensed under GNU GPL v2
For bug reports, read
        http://openocd.org/doc/doxygen/bugs.html
jtag
Warn : Transport "jtag" was already selected
DEPRECATED! use 'adapter speed' not 'adapter_khz'
adapter speed: 1000 kHz

Info : Listening on port 6666 for tcl connections
Info : Listening on port 4444 for telnet connections
Info : Using CMSIS-DAPv2 interface with VID:PID=0x0483:0x5740, serial=DAP_Uticona
Info : CMSIS-DAP: SWD supported
Info : CMSIS-DAP: JTAG supported
Info : CMSIS-DAP: FW Version = 2.0.0
Info : CMSIS-DAP: Serial# = DAP_Uticona
Info : CMSIS-DAP: Interface Initialised (JTAG)
Info : SWCLK/TCK = 1 SWDIO/TMS = 1 TDI = 1 TDO = 1 nTRST = 0 nRESET = 1
Info : CMSIS-DAP: Interface ready
Info : clock speed 1000 kHz
Info : cmsis-dap JTAG TLR_RESET
Info : cmsis-dap JTAG TLR_RESET
Info : JTAG tap: sam7x.cpu tap/device found: 0x3f0f0f0f (mfg: 0x787 (<unknown>), part: 0xf0f0, ver: 0x3)
Info : Embedded ICE version 1
Info : sam7x.cpu: hardware has 2 breakpoint/watchpoint units
Info : starting gdb server for sam7x.cpu on 3333
Info : Listening on port 3333 for gdb connectionsCode language: HTML, XML (xml)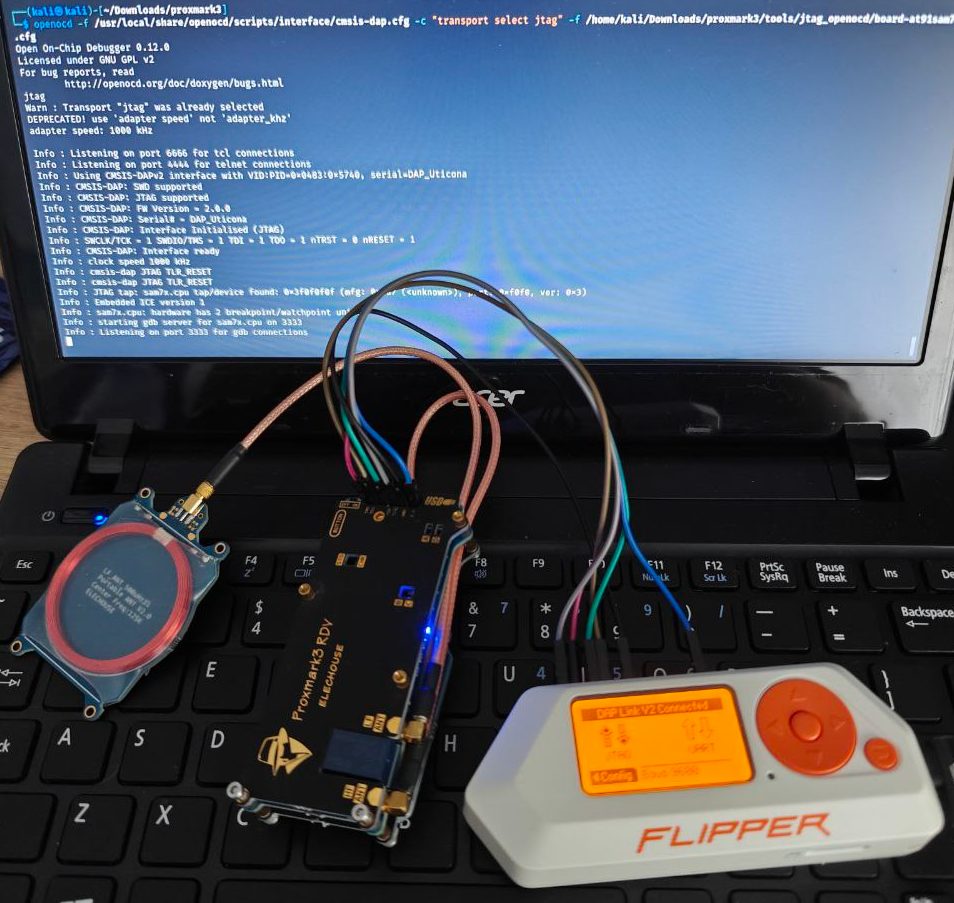
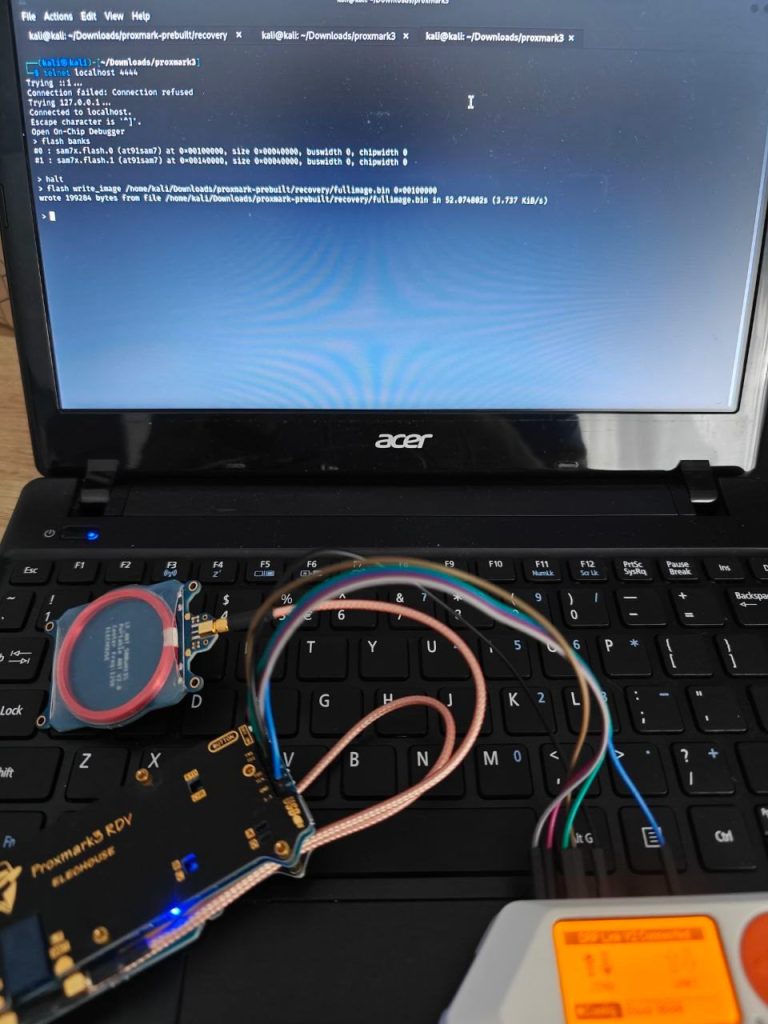
The most important part for us is that the service was opened on 4444 port. Now, we can use telnet in order to interact with it!
$ telnet localhost 4444
Trying ::1...
Connection failed: Connection refused
Trying 127.0.0.1...
Connected to localhost.
Escape character is '^]'.
Open On-Chip Debugger
> flash banks
#0 : sam7x.flash.0 (at91sam7) at 0x00100000, size 0x00040000, buswidth 0, chipwidth 0
#1 : sam7x.flash.1 (at91sam7) at 0x00140000, size 0x00040000, buswidth 0, chipwidth 0

> halt
> flash write_image /home/kali/Downloads/proxmark-prebuilt/recovery/proxmark3_recovery.bin 0x00100000
wrote 207476 bytes from file /home/kali/Downloads/proxmark-prebuilt/recovery/proxmark3_recovery.bin in 54.381119s (3.726 KiB/s)Code language: PHP (php)
flash bankscommand is used to list all detected flash memory banks on the target device that OpenOCD has recognized and configured. We can also note the memory addresses which we will use for flashing –0x00100000haltcommand in OpenOCD stops (halts) the target CPU via JTAG or SWD. This is necessary for debugging, flashing, or modifying the system state.flash write_image /home/kali/Downloads/proxmark-prebuilt/recovery/proxmark3_recovery.bin 0x00100000
Above command is used in OpenOCD to write a firmware image (proxmark3_recovery.bin) to a specific memory address (0x00100000 – again, we got that from theflash bankscommand).
Finishing the process
Now, we already flashed the recovery image to our Proxmark. In order to get it working back, connect it to the PC on which you normally used it (on which Proxmark software is installed) and use pm3-flash-bootrom, pm3-flash-fullimage commands, and then, finally, start it using pm3.
» pm3-flash-bootrom
[=] Session log /home/marcin/.proxmark3/logs/log_20250212151658.txt
[+] loaded `/home/marcin/.proxmark3/preferences.json`
[+] About to use the following file:
[+]    /usr/local/bin/../share/proxmark3/firmware/bootrom.elf
[+] Loading ELF file /usr/local/bin/../share/proxmark3/firmware/bootrom.elf
[+] ELF file version Iceman/master/v4.19552-29-gb75818116-suspect 2024-11-29 13:24:02 da2aa137f

[+] Waiting for Proxmark3 to appear on /dev/ttyACM0
 🕑  59 found
[+] Entering bootloader...
[+] (Press and release the button only to abort)
[+] Trigger restart...
[+] Waiting for Proxmark3 to appear on /dev/ttyACM0
 🕑  49 found
[!!] 🚨 ====================== OBS ! ===========================================
[!!] 🚨 Note: Your bootloader does not understand the new CMD_BL_VERSION command
[!!] 🚨 It is recommended that you first update your bootloader alone,
[!!] 🚨 reboot the Proxmark3 then only update the main firmware


[!!] 🚨 ------------- Follow these steps -------------------

[!!] 🚨  1)   ./pm3-flash-bootrom
[!!] 🚨  2)   ./pm3-flash-fullimage
[!!] 🚨  3)   ./pm3

[=] ---------------------------------------------------

[=] Available memory on this board: UNKNOWN

[!!] 🚨 ====================== OBS ! ======================================
[!!] 🚨 Note: Your bootloader does not understand the new CHIP_INFO command
[=] Permitted flash range: 0x00100000-0x00140000
[+] Loading usable ELF segments:
[+]    0: V 0x00100000 P 0x00100000 (0x00000200->0x00000200) [R X] @0x94
[+]    1: V 0x00200000 P 0x00100200 (0x000014e0->0x000014e0) [R X] @0x298

[+] Flashing...
[+] Writing segments for file: /usr/local/bin/../share/proxmark3/firmware/bootrom.elf
[+]  0x00100000..0x001001ff [0x200 / 1 blocks]
. ok
[+]  0x00100200..0x001016df [0x14e0 / 11 blocks]
........... ok

[+] All done

[=] Have a nice day!

» pm3-flash-fullimage
[=] Session log /home/marcin/.proxmark3/logs/log_20250212151716.txt
[+] loaded `/home/marcin/.proxmark3/preferences.json`
[+] About to use the following file:
[+]    /usr/local/bin/../share/proxmark3/firmware/fullimage.elf
[+] Loading ELF file /usr/local/bin/../share/proxmark3/firmware/fullimage.elf
[+] ELF file version Iceman/master/v4.19552-29-gb75818116-suspect 2024-11-29 13:24:23 da2aa137f

[+] Waiting for Proxmark3 to appear on /dev/ttyACM0
 🕑  59 found
[+] Entering bootloader...
[+] (Press and release the button only to abort)
[+] Trigger restart...
[+] Waiting for Proxmark3 to appear on /dev/ttyACM0
 🕓  59 found
[=] Available memory on this board: 512K bytes

[=] Permitted flash range: 0x00102000-0x00180000
[+] Loading usable ELF segments:
[+]    1: V 0x00102000 P 0x00102000 (0x00059c54->0x00059c54) [R X] @0xb8
[+]    2: V 0x00200000 P 0x0015bc54 (0x00001de4->0x00001de4) [R X] @0x59d10
[=] Note: Extending previous segment from 0x59c54 to 0x5ba38 bytes

[+] Flashing...
[+] Writing segments for file: /usr/local/bin/../share/proxmark3/firmware/fullimage.elf
[+]  0x00102000..0x0015da37 [0x5ba38 / 734 blocks]
...................................................................
        @@@  @@@@@@@ @@@@@@@@ @@@@@@@@@@   @@@@@@  @@@  @@@
        @@! !@@      @@!      @@! @@! @@! @@!  @@@ @@!@!@@@
        !!@ !@!      @!!!:!   @!! !!@ @!@ @!@!@!@! @!@@!!@!
        !!: :!!      !!:      !!:     !!: !!:  !!! !!:  !!!
        :    :: :: : : :: :::  :      :    :   : : ::    :
        .    .. .. . . .. ...  .      .    .   . . ..    .
...................................................................
...................................................................
...................................................................
...................................................................
.............................. ok

[+] All done

[=] Have a nice day!

 » pm3
[=] Waiting for Proxmark3 to appear...

# ^ this actually took a while before everything started up, be patient

[=] Session log /home/marcin/.proxmark3/logs/log_20250212152551.txt
[+] loaded `/home/marcin/.proxmark3/preferences.json`
[+] Using UART port /dev/ttyACM0
[+] Communicating with PM3 over USB-CDC


  8888888b.  888b     d888  .d8888b.
  888   Y88b 8888b   d8888 d88P  Y88b
  888    888 88888b.d88888      .d88P
  888   d88P 888Y88888P888     8888"
  8888888P"  888 Y888P 888      "Y8b.
  888        888  Y8P  888 888    888
  888        888   "   888 Y88b  d88P
  888        888       888  "Y8888P"    [ ☕ ]


  [ Fuel open source revolution! ]
     Patreon - https://www.patreon.com/iceman1001/


qt5ct: using qt5ct plugin
  [ Proxmark3 RFID instrument ]

    MCU....... AT91SAM7S512 Rev B
    Memory.... 512 KB ( 73% used )

    Client.... Iceman/master/v4.19552-29-gb75818116 2024-11-29 13:24:13
    Bootrom... Iceman/master/v4.19552-29-gb75818116-suspect 2024-11-29 13:24:02
    OS........ Iceman/master/v4.19552-29-gb75818116-suspect 2024-11-29 13:24:23
[-] ⛔ fail reading from flashmemory
    Target.... device / fw mismatch

[usb] pm3 --> Code language: PHP (php)
I hope that you got your Proxmark running again! Now, let’s dive into more things that JTAG can be useful for.
Testing security with JTAG
JTAG is not just a debugging tool for developers — it is also a powerful attack vector in hardware penetration testing. Since JTAG provides low-level access to a device’s processor, memory, and peripherals, it can be exploited to bypass security mechanisms, extract sensitive data, or even inject malicious firmware.
How JTAG is used in Hardware Penetration Testing
- Bypassing Security Protections
Many embedded devices rely on software-based security, but JTAG can bypass authentication mechanisms by directly manipulating memory and registers. Attackers can disable bootloader protections, change security flags, or force privileged execution modes. - Extracting Firmware and Secrets
Using JTAG, you can dump firmware directly from a device’s flash or RAM. Extracting firmware allows analysis for hardcoded credentials, encryption keys or other vulnerabilities. - Manipulating Runtime Behavior
Since JTAG allows real-time debugging, attackers can modify register values, change execution flow, or disable security checks. This can be used to bypass authentication (e.g., changing a flag that grants admin access). - Injecting and Modifying Firmware
Attackers can use JTAG to write custom firmware, effectively replacing legitimate code with backdoors or keyloggers. This technique is often used in persistent attacks against embedded devices (e.g., routers, IoT devices, or smartcards).
Real-World use cases in Pentesting
- IoT & Embedded Devices: Smart home devices, routers, and industrial control systems often have exposed JTAG interfaces, making them easy targets for firmware extraction and modification.
- Automotive Hacking: JTAG can be used to analyze ECUs (Electronic Control Units) in vehicles, allowing attackers to manipulate firmware or extract security keys.
- Secure Boot Bypass: If a device implements secure boot incorrectly, JTAG access may allow an attacker to bypass verification mechanisms and run unauthorized code.
- Tampering with Security Modules: JTAG can be used to disable DRM mechanisms, modify payment terminals, or break hardware-based encryption schemes.
Defense against JTAG exploits
To mitigate JTAG-based attacks, manufacturers should:
- Disable JTAG in production devices (use fuses or software locks).
- Implement JTAG authentication (restrict access using cryptographic authentication methods).
- Physically remove JTAG test points or hide them under BGA chips.
- Use tamper detection circuits that erase sensitive data when JTAG access is attempted.
Conclusion
JTAG is a double-edged sword — it is invaluable for legitimate debugging, hardware development and briging the devices back to life, but it also provides attackers with a direct path to bypass security, extract secrets, and modify firmware.
